Attributes are colour-coded labels you create once and then add to accounts, contacts, orders and drivers, so that everyone can see what an order needs and what a driver has. An attribute whose type is Order and Driver also controls dispatch: it can prevent a dispatch, or ask the dispatcher to confirm it, when the attributes of an order and of a driver do not match.
Table of Contents
- Configure Who Can View and Edit Attributes
- Open the Attributes List
- Create an Attribute
- Choose the Right Dispatch Option
- Edit an Attribute
- Assign Attributes to an Account
- Assign Attributes to a Contact
- Assign Attributes to a Driver
- Assign Attributes to an Order
- Impact of Attributes on Dispatch and Adjacent Screens
- Archive an Attribute
- Unarchive an Attribute
Configure Who Can View and Edit Attributes
Attributes are governed by two pairs of permissions: one pair for the attribute configuration screens, one pair for a driver's attributes. Give a user the right pair before asking them to work with attributes.
| What You Need | What It Unlocks | Without It |
|---|---|---|
| Back Office access, plus either the permission to view attributes or the permission to edit them | Opens Settings > Configurations > System > Attributes and the read-only attribute screen | The menu entry is not displayed and the attribute screens cannot be opened |
| The permission to edit attributes | The New Attribute button, the editable attribute form, and the Archive and Unarchive buttons | New Attribute is hidden, and clicking an Id in the list opens the read-only screen, with no Save, Archive or Unarchive button |
| Back Office access, plus either the permission to view an account's attributes or the permission to edit them | The Attributes panel on the account record | The panel is not displayed on the account record |
| The permission to edit an account's attributes | The Edit button in that panel, and the account Attributes page | The Edit button is not displayed, so the account's attributes cannot be changed |
| The permission to edit the address book that holds the contact (there is no permission of its own for a contact's attributes) | The Attributes section inside the contact form, in the Back Office and in the Self-Serve portal | The contact form cannot be opened for editing, so the contact's attributes cannot be changed |
| Either the permission to view a driver's attributes or the permission to edit them | The read-only Attributes panel on the driver record | The panel is not displayed on the driver record |
| The permission to edit a driver's attributes | The Edit button in that panel, and the driver Attributes screen | The Edit button is not displayed, so the driver's attributes cannot be changed |
Each of these permissions is selected on the user's role. See the Dispatch Science guide on user roles and permissions for how to select a permission on a role.
Open the Attributes List
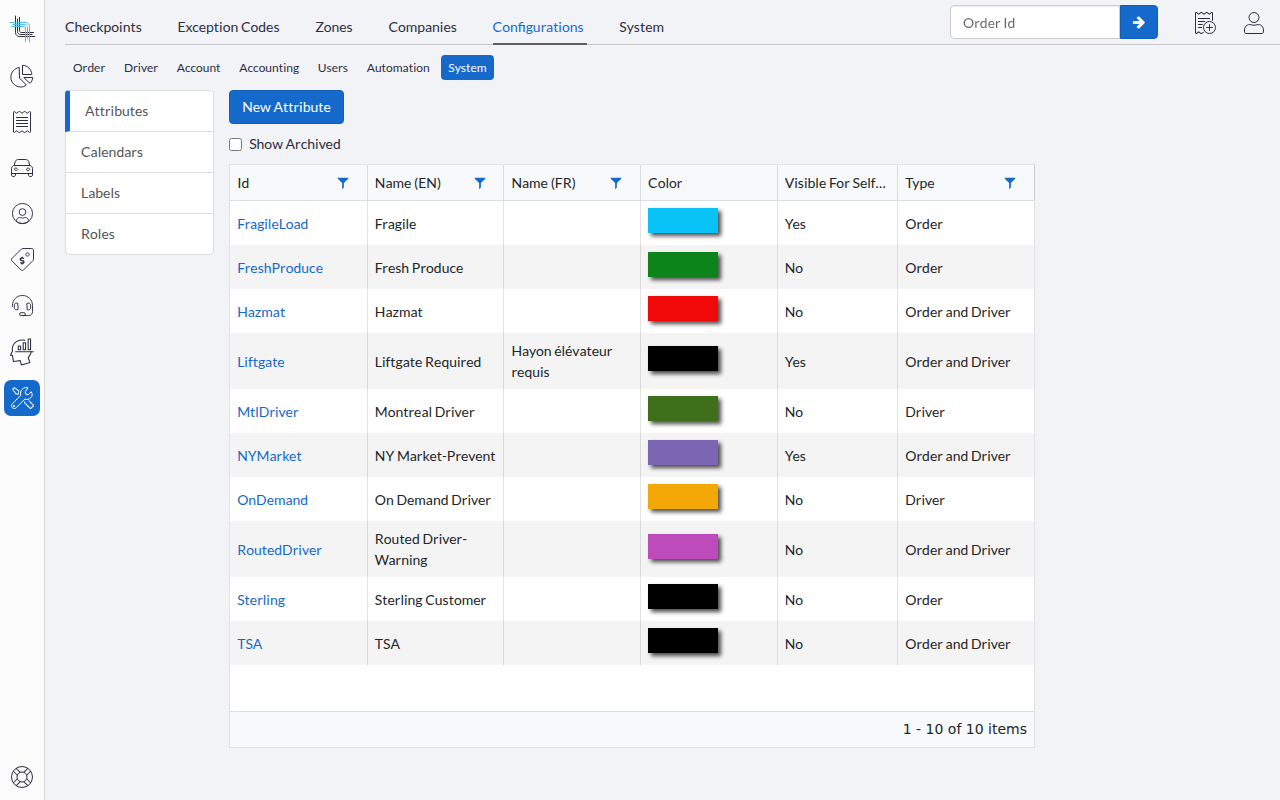
The Attributes list is where the attributes of your own company are managed. It shows the attributes in use; archived ones are left out until you ask for them.
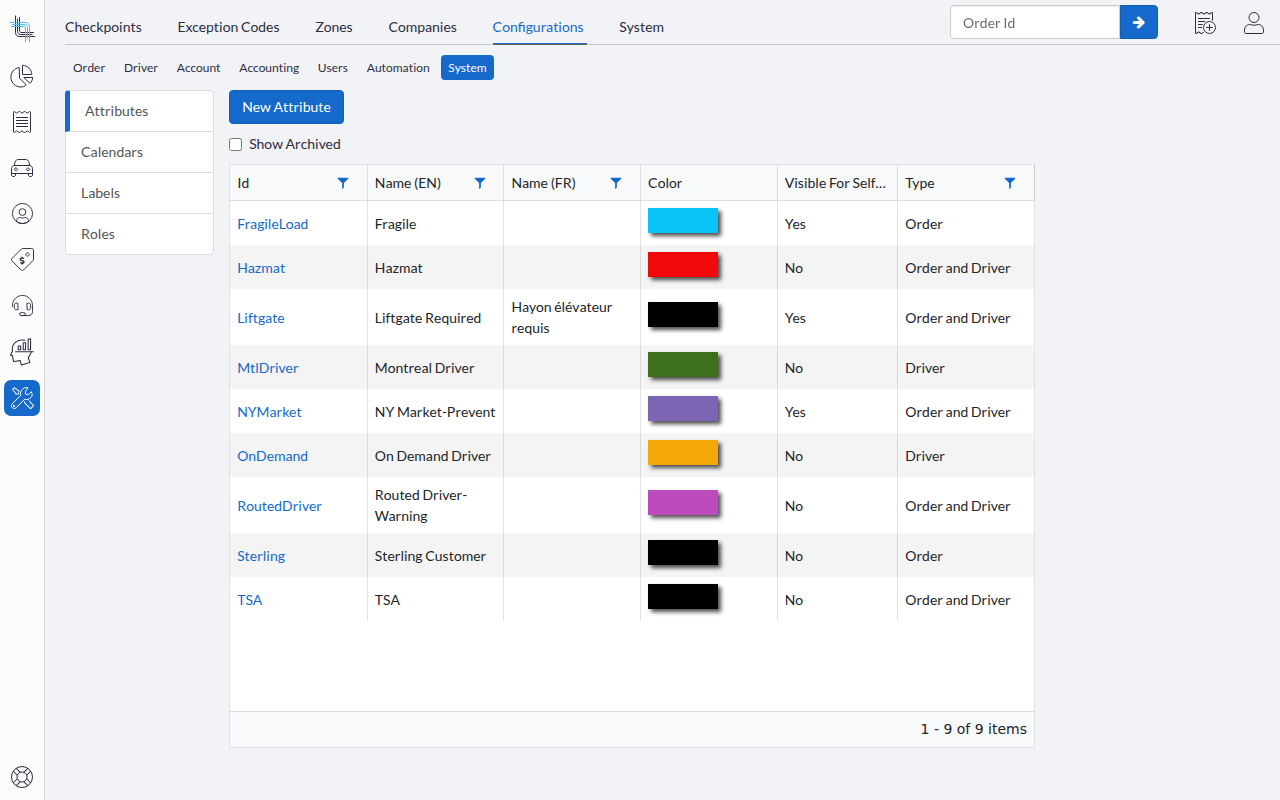
- Navigate to Settings > Configurations > System > Attributes. The list opens:
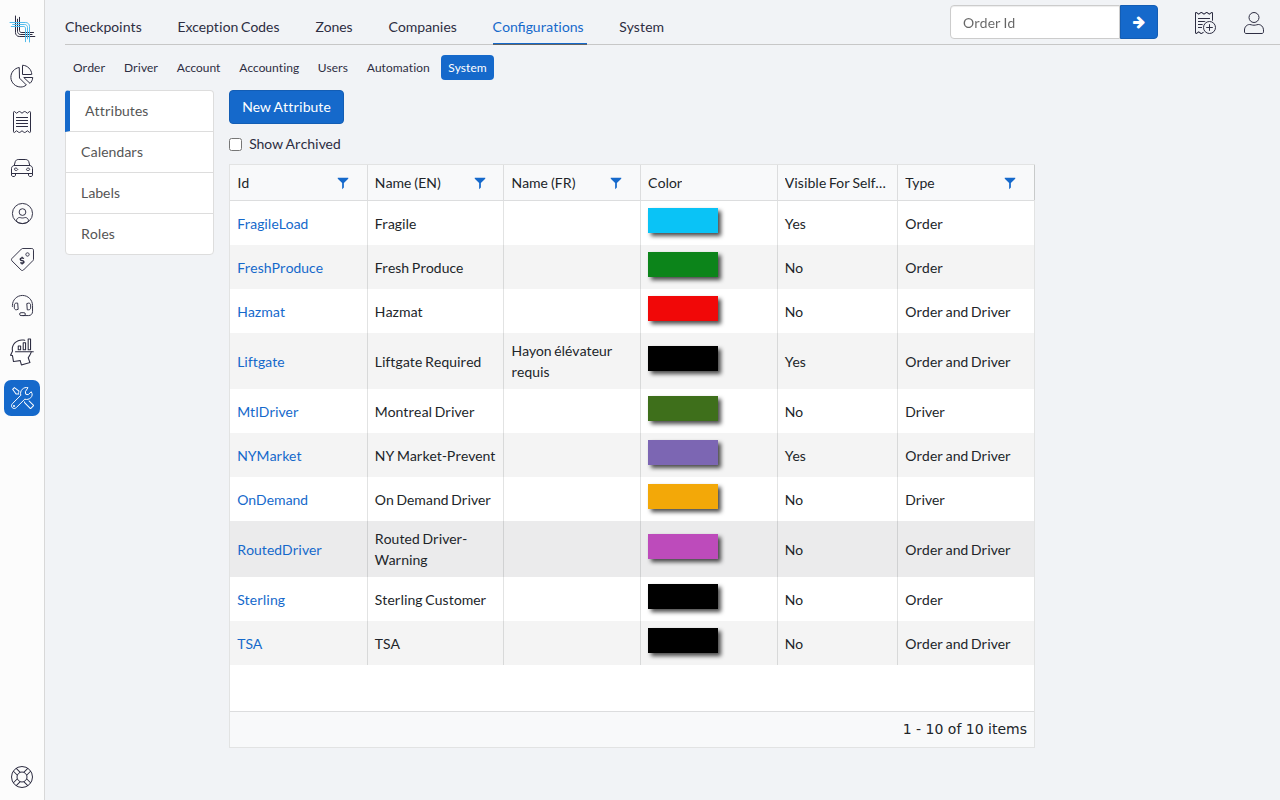
- Read the six columns: Id, the two Name columns (one per configured language, for example Name (EN) and Name (FR)), Color as a swatch, Visible For Self-Serve as Yes or No, and Type as Order, Driver or Order and Driver. Descriptions are not listed here.
- Filter or sort a column to find an attribute. Id, the two Name columns and Type can be filtered; Color and Visible For Self-Serve cannot.
- Click New Attribute to create an attribute, or click an Id to open an existing one.
Show the Archived Attributes
Finding an archived attribute, for instance to put it back in use, starts here.
- On the Attributes list, check the box for Show Archived. The archived attributes join the list:
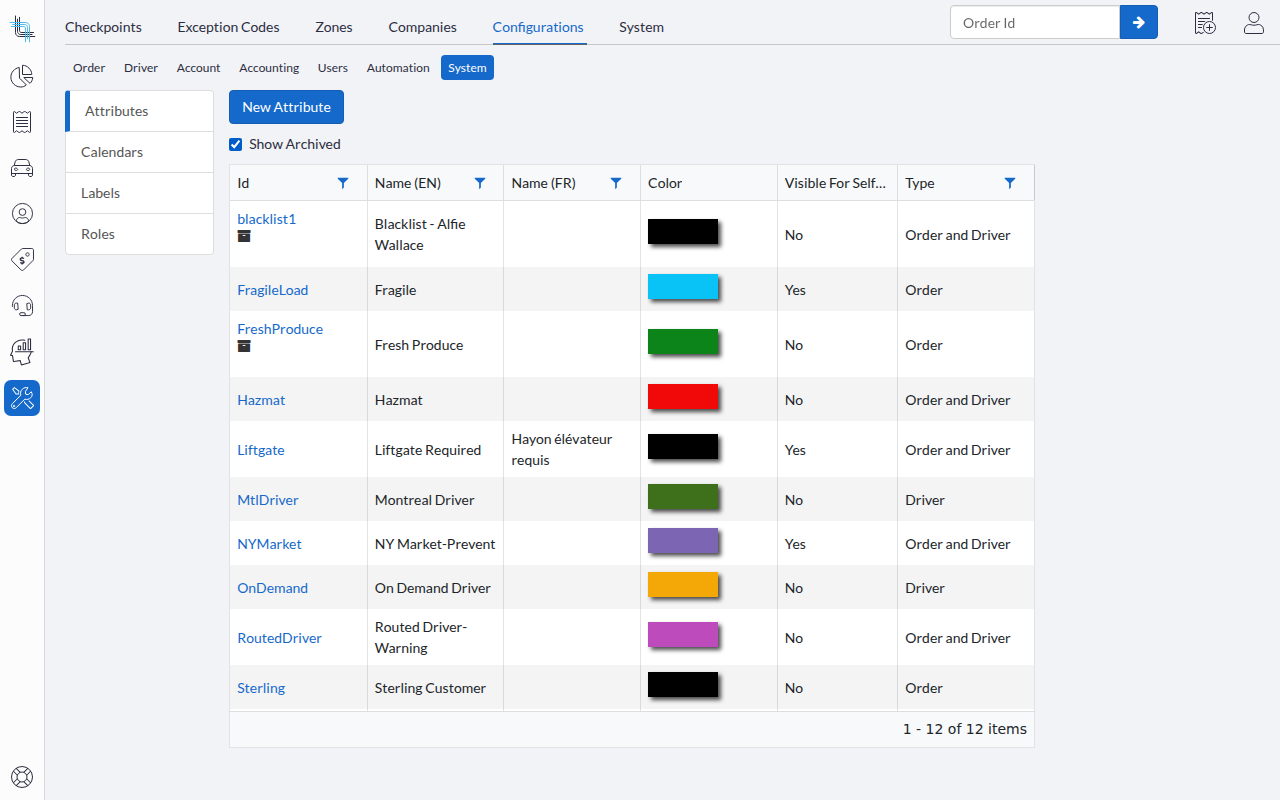
- Identify the archived rows by the archive icon beside the Id. Its tooltip reads "Archived attribute":

Create an Attribute
An attribute is created once and then reused everywhere. The values you enter here decide where the attribute can be added, who can see it, and whether it restricts dispatch.
- Navigate to Settings > Configurations > System > Attributes.
- Click New Attribute. The empty form opens:
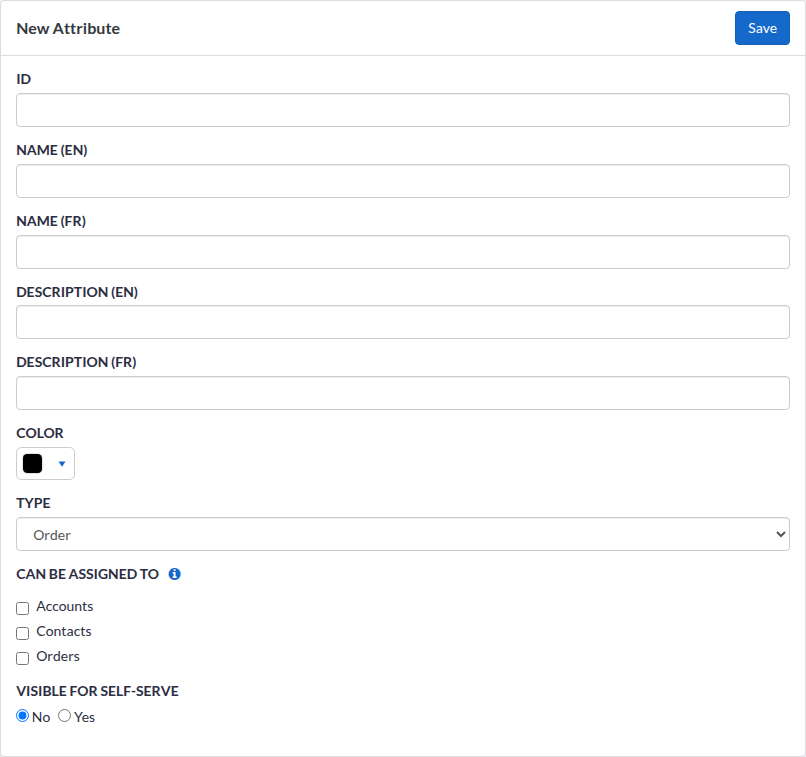
- Enter the Id. It is required, holds 1 to 36 characters, and accepts letters, digits, hyphens and underscores only.
- The Id identifies the attribute in your company and must not already be used. Creating a duplicate displays "An attribute with the same Id already exists" on the field, and the attribute is not created.
- The Id cannot be changed once the attribute exists, so choose it with care.
- An invalid value redisplays the form with "The field Id is required" or "The field Id may only contains letters, numbers, -, _", and nothing is saved.
- Enter the Name in the primary language. It is required. The Namein the second language is optional.
- The name identifies the attribute on the order and driver screens, behind the dispatch board flags and in the dispatch messages, in the language in use.
- Enter the Description in the primary language. It is required. The Descriptionin the second language is optional.
- The description is displayed next to the name in the attribute pickers and in the order and driver attribute lists of the dispatch board.
- Select a Color. It is required.
- This colour is the colour of the attribute's flag wherever the attribute is displayed in the Back Office and on the dispatch board.
- Select the Type: Order, Driver or Order and Driver. It is required.
- The type decides where the attribute can be added at all, and which of the three fields below the form shows.
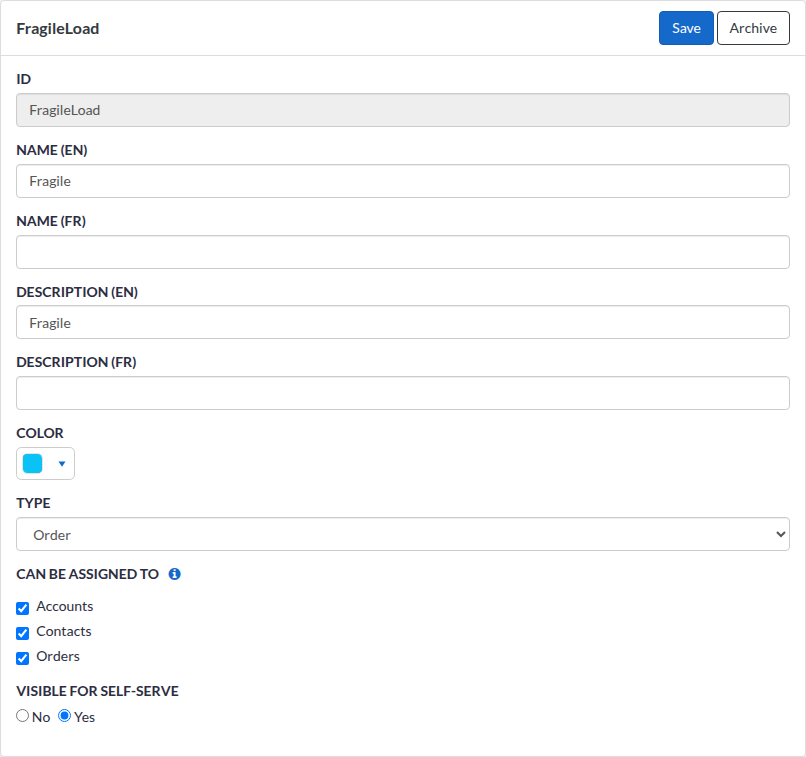
- Under Can be assigned to, check the records the attribute may be added to.
- Set Visible For Self-Serve to Yes or No. A new attribute starts on No.
- Select a Dispatch Option.
- Click Save. The Attributes list reappears with the message "Attribute created".
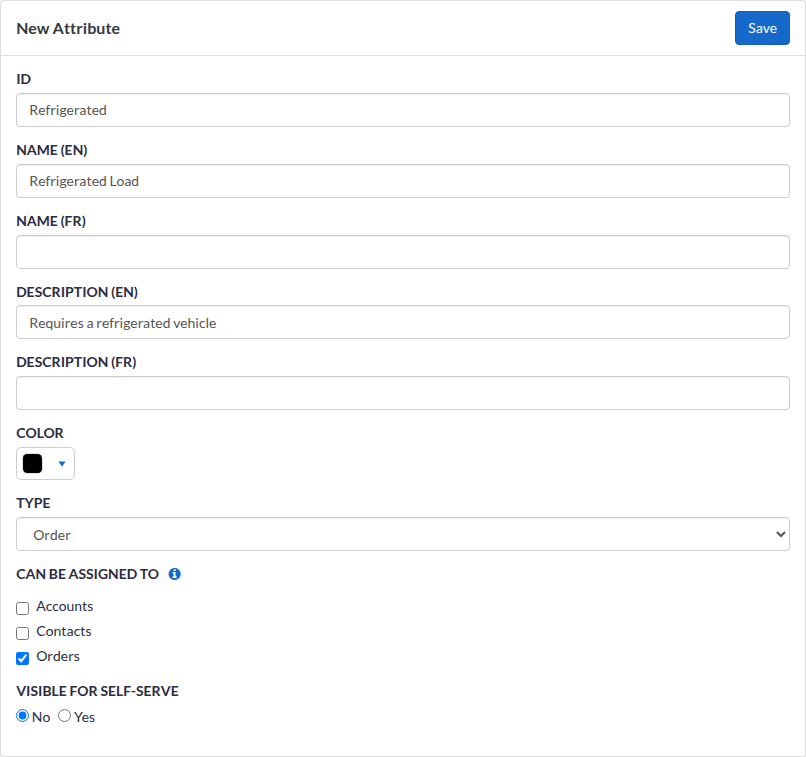
A missing required value redisplays the form with a message naming the field, for example "The field Name (EN) is required", and nothing is saved. If the save itself fails, the form is redisplayed with "An unexpected error occurred" and nothing is saved.
Fields Shown by the Type
Can be assigned to, Visible For Self-Serve and Dispatch Option appear and disappear as soon as you change the Type. The other seven fields are always shown.
| Type | Can be Assigned to | Visible for Self-Serve | Dispatch Option |
|---|---|---|---|
| Order | Shown, with Accounts, Contacts and Orders | Shown | Hidden |
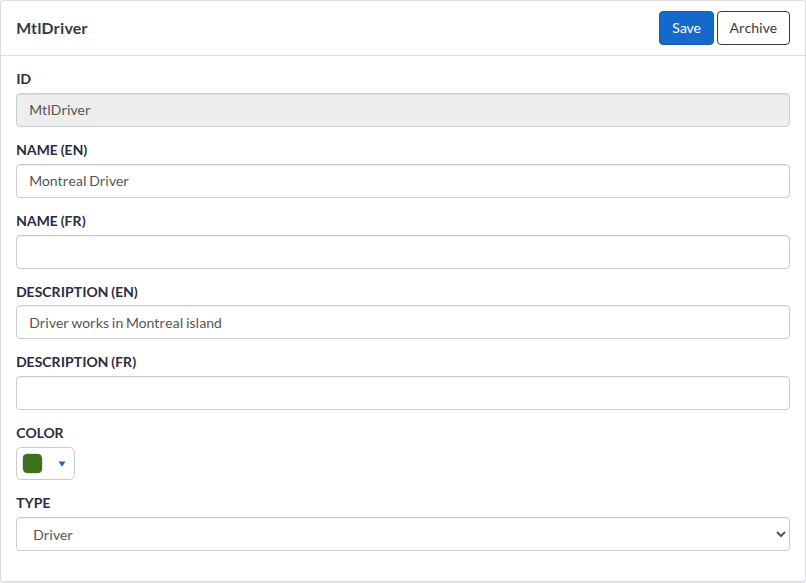
| Driver | Hidden | Hidden | Hidden |
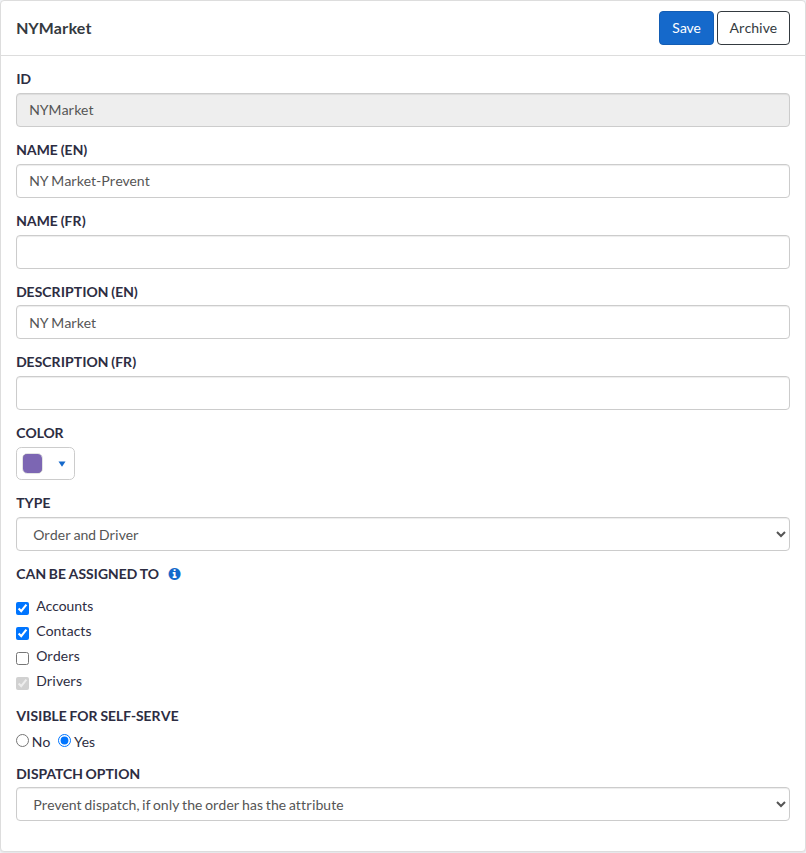
| Order and Driver | Shown, with Accounts, Contacts, Orders, plus a Drivers box that is checked and cannot be unchecked | Shown | Shown |
With the type Order, the attribute can be added to accounts, contacts and orders, whichever are checked, and never to a driver:
With the type Driver, the attribute can be added to drivers only, and the form shows just Id, the two Name fields, the two Description fields, Color and Type:
With the type Order and Driver, the attribute can be added to both sides, and it is the only type that takes part in dispatch validation:
Choose Where the Attribute Can Be Assigned
At least one of Accounts, Contacts and Orders must be checked. Clicking Save with none of them checked displays "At least one selection is required" under the boxes, and the form is not submitted. The Drivers box of an Order and Driver attribute does not count towards this rule, because it is checked by the product and cannot be unchecked.
The attribute can only be added to the records checked here. There is one addition to that rule: an order inherits by default the attributes of its account, its pickup contact and its delivery contact, even when Orders is not checked. Those inherited attributes arrive on the order already checked.
Click the info icon beside Can be assigned to to display the same reminder on screen:

Set the Self-Serve Visibility
Visible For Self-Serve decides who is offered the attribute on an order.
- No, the value of a new attribute, keeps the attribute out of the list offered to Self-Serve users creating or editing an order. Back Office users still see it.
- Yes offers the attribute to Self-Serve users as well.
- The value is stored even when the Type hides the field, so a Driver attribute can carry one. It has no visible effect there, since driver attributes are never offered on an order.
Set the Dispatch Option
Dispatch Option is offered only for the type Order and Driver, and it has no blank entry. A new Order and Driver attribute therefore shows the first value, Prevent dispatch, if both have the attribute, until you select another one. Select the option you want before saving. Each option is described in Choose the Right Dispatch Option.
Choose the Right Dispatch Option
The Dispatch Option decides what Dispatch Science does when an order and a driver meet and one or both of them has the attribute. The field, and therefore all seven options, including the two that turn on the driver having the attribute, appears only when the Type is Order and Driver. An Order attribute and a Driver attribute never prevent and never warn in any of the checks described in this guide, whatever else is configured.
The dropdown offers the seven options in a fixed order, with Allow always last:

| Option | When a Dispatcher Dispatches Manually | In Automatic Dispatch |
|---|---|---|
| Prevent dispatch, if both have the attribute | The order is not dispatched to that driver when the order and the driver both have the attribute | The driver is excluded from the candidates |
| Prevent dispatch, if only the order has the attribute | The order is not dispatched to that driver when the order has the attribute and the driver does not | The driver is excluded from the candidates |
| Allow with warning, if both have the attribute | The dispatcher has to confirm when the order and the driver both have the attribute | The driver is excluded from the candidates |
| Allow with warning, if only the order has the attribute | The dispatcher has to confirm when the order has the attribute and the driver does not | The driver is excluded from the candidates |
| Prevent dispatch, if only the driver has the attribute | The order is not dispatched to that driver when the driver has the attribute and the order does not | The driver is excluded from the candidates |
| Allow with warning, if only the driver has the attribute | The dispatcher has to confirm when the driver has the attribute and the order does not | The driver stays a candidate |
| Allow | No restriction: the attribute is purely informative | No restriction |
An attribute that carries no dispatch option at all behaves like Allow.
Edit an Attribute
Editing an attribute changes it everywhere it is already used: the new name, description and colour follow the attribute onto the records that have it. Two changes go further and remove existing associations, so read the sub-sections below before you touch the Type or the Can be assigned to boxes.
- Navigate to Settings > Configurations > System > Attributes.
- Click the attribute's Id. The form opens with the current values:
- Change the fields you need. The Id is displayed disabled, so it cannot be changed.
- Click Save. The Attributes list reappears with the message "Attribute updated".
Everything else stays as it was: the attribute keeps its Id, and the drivers, accounts, contacts and orders that have it keep it, except in the two cases below. The same required fields and the same "at least one selection" rule apply as on creation.
Change the Type
The form immediately shows or hides Can be assigned to, Visible For Self-Serve and Dispatch Option. Saving then applies the following:
- Changing the type to Order removes the attribute from every driver that had it. Those drivers stop counting it in dispatch validation, and their flags on the live dispatch board are refreshed straight away.
- Changing the type to Driver removes the attribute from every account and every contact that had it, so orders stop inheriting it from them. The orders that already have the attribute keep it.
- Saving with the type Driver also clears the Accounts, Contacts and Orders boxes. If the type is later set back to Order or Order and Driver, those boxes come back empty and have to be checked again.
- Changing the type away from Order and Driver clears the stored dispatch option, so the attribute stops restricting dispatch. Setting the type back to Order and Driver means choosing a Dispatch Option again.
Change the Records the Attribute Can Be Assigned To
At least one of Accounts, Contacts and Orders must stay checked. Each box behaves differently when it is unchecked:
- Unchecking Accounts deletes the attribute from every account of your company that had it, and orders stop inheriting it from those accounts.
- Unchecking Contacts deletes the attribute from every contact of your company that had it, and orders stop inheriting it from those contacts.
- Unchecking Orders changes nothing for the orders that already have the attribute: they keep it. Only new orders stop being offered it.
Consult an Attribute Without the Edit Permission
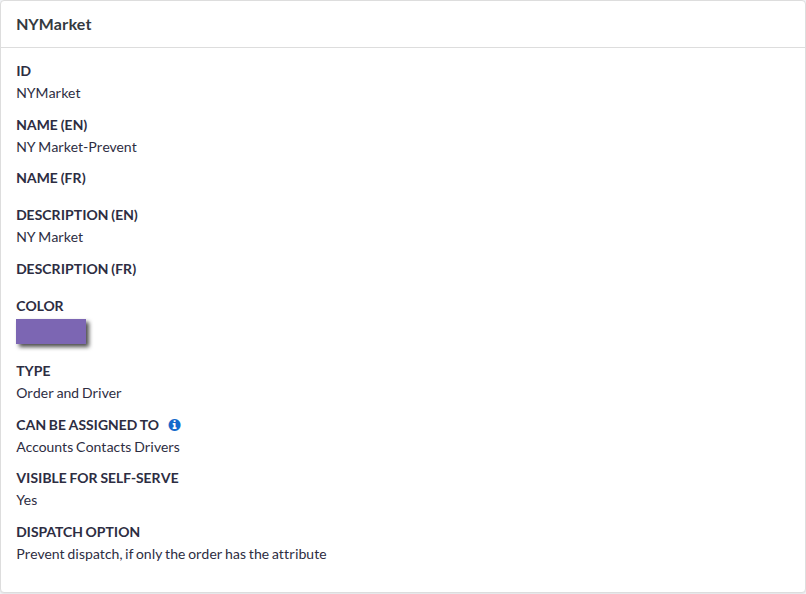
Without the permission to edit attributes, clicking an Id in the list opens the attribute read-only. Every value is printed as text, the colour as a swatch, the checked availabilities as words (Accounts, Contacts, Orders, Drivers), and no Save, Archive or Unarchive button is offered. This screen is read-only for everyone, whatever their permissions:
Assign Attributes to an Account
An account's attributes state what the orders of that account need. They are entered once on the account instead of on every order: a new order created for the account arrives with them already checked.
- Navigate to Accounts, then open the account.
- In the Attributes panel, read the attributes the account already has, then click Edit:

- The account Attributes page opens on the two-column picker: Available on the left, Selected on the right:
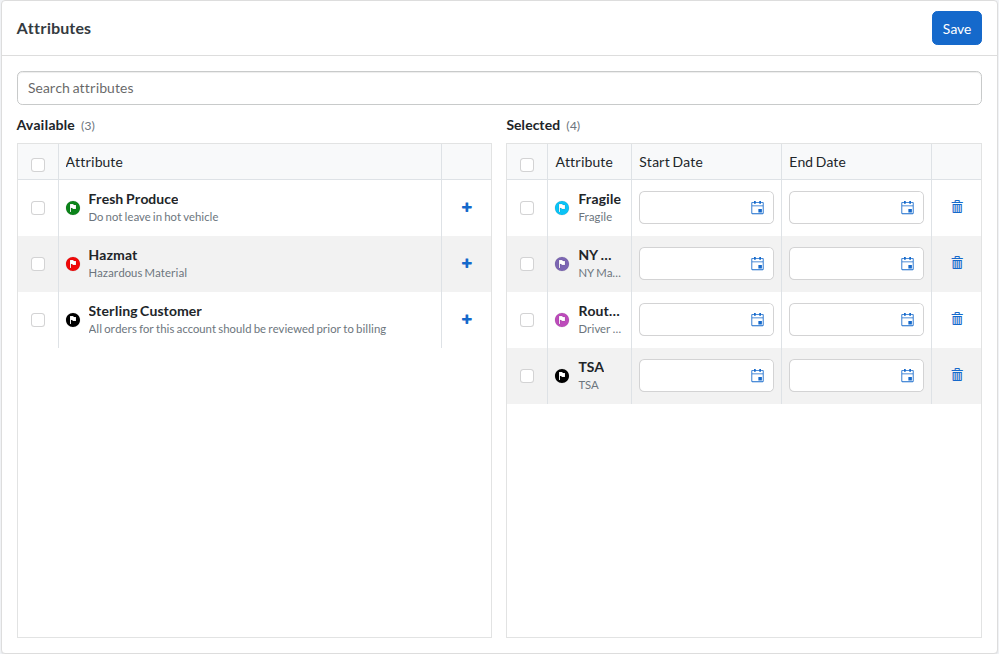
- Add the attributes the account needs and remove the ones it no longer needs, as described in Use the Two-Column Picker.
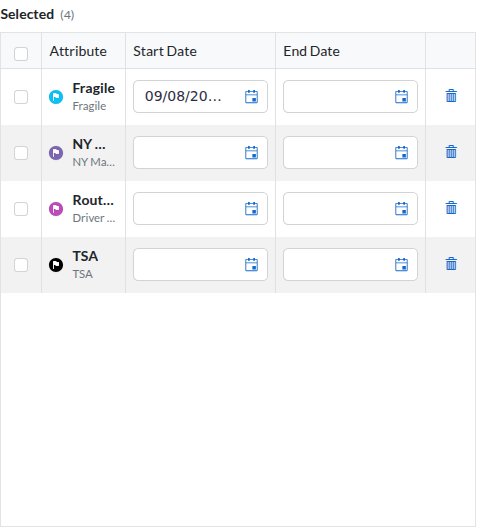
- If an attribute applies only for a period, fill its Start Date, its End Date, or both, as described in Set a Start Date and an End Date:
- Click Save, at the top right of the panel. The account reappears with the message "The attributes were saved successfully".
What the screen offers you:
- Only attributes whose Type is Order or Order and Driver and that are marked available for Accounts are listed. A Driver attribute can never be given to an account.
- Each entry shows a flag in the attribute's colour, the attribute name, and its description underneath.
- An archived attribute is never offered in Available. One the account already had stays in Selected with an Archived badge, so that it can be removed.
- The Attributes panel of the account record lists the names of the attributes the account has, whatever their dates. The dates themselves are read on the Attributes page.
Use the Two-Column Picker
The same two-column picker is used for an account, for a contact and for a driver, so what follows applies to the three of them. It writes nothing by itself: an account's and a driver's attributes are saved with the Save button of their own page, and a contact's attributes are saved with the contact form.
| What You Want | What You Do | Good to Know |
|---|---|---|
| Find an attribute | Type in the search box above the two columns | The search filters both columns at once, on the name and on the description, and the lists follow as you type |
| Add one attribute | Click the + button on its row, in Available | It moves to Selected immediately, in alphabetical order |
| Add several attributes at once | Check the box of each attribute, then click Add n attributes in the header of Available | The button appears only once a box is checked, and it counts what is checked. While a box is checked in a column, the + buttons of that column are disabled — uncheck everything to get them back |
| Remove one attribute | Click the trash button on its row, in Selected | No confirmation is asked |
| Remove several attributes at once | Check the box of each attribute, then click Remove n attributes in the header of Selected | Same rule as for adding: while a box is checked, the trash buttons of that column are disabled |
| Check every attribute of a column | Use the checkbox in the column header | It applies to the rows the search leaves visible, not to the rows it hides |
| Know where you stand | Read the count beside each column title | It shows the total, or "visible/total" while a search is filtering the column. An empty column reads "No attributes available." on the left and "No attributes selected. Add attributes from the left panel." on the right |
Set a Start Date and an End Date
On an account and on a contact, each attribute in Selected has a Start Date and an End Date column. They give the attribute a period of validity, which is what you use for a temporary requirement, for a seasonal one, or for a requirement announced in advance. A driver's attributes have no dates: the driver picker does not display these two columns.
- Both dates are optional. Leave the two of them empty for an attribute that always applies.
- A Start Date counts from the beginning of that day; an End Date counts until the end of that day.
- Outside its period, the attribute stays on the account or on the contact but no longer acts: the orders created at that moment do not inherit it.
- A Start Date later than the End Date highlights the row and the save is refused with the message "Start Date must be before End Date". On an account the message is displayed on the page; on a contact it joins the errors listed at the top of the form. Correct the dates, then save again.
Assign Attributes to a Contact
A contact's attributes state what a pickup or a delivery at that address needs. An order created with that contact as its pickup or as its delivery arrives with them already checked.
Assign a Contact's Attributes in the Back Office
- Navigate to Accounts, open the account, then open its Address Book.
- Open the contact. Its form opens.
- Go down to the Attributes section. The same two-column picker is displayed, with the Start Date and End Date columns:
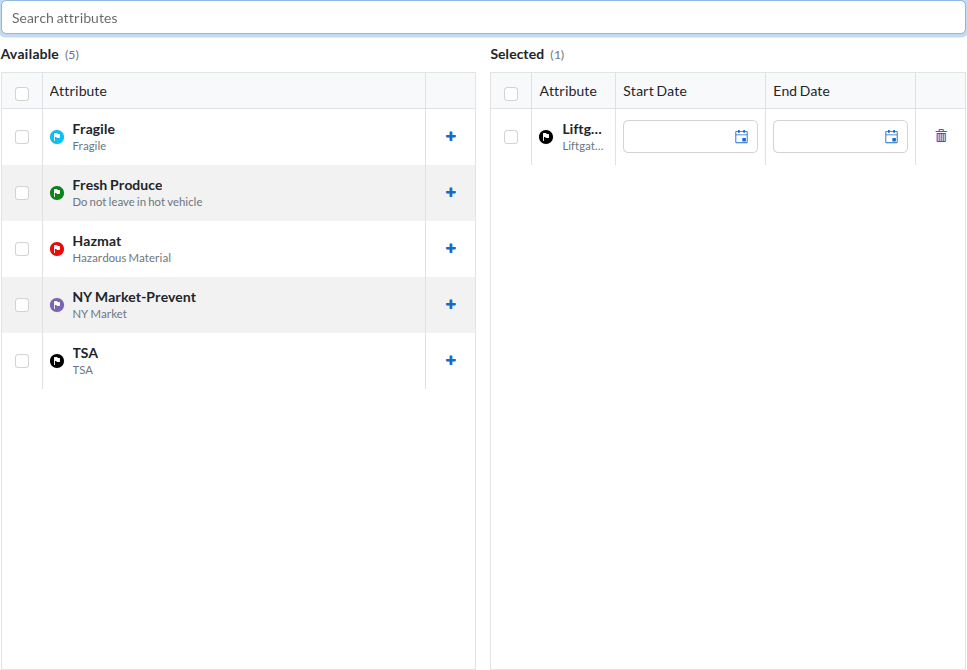 Attributes section with the two columns]
 - Add and remove the attributes, and fill the dates if needed.
- Save the contact with the Save button of the form. The contact and its attributes are saved together.
What the screen offers you:
- Only attributes whose Type is Order or Order and Driver and that are marked available for Contacts are listed.
- The Attributes section is not displayed when several contacts are edited at once: attributes are assigned one contact at a time.
- An archived attribute already on the contact stays in Selected with an Archived badge, and is never offered in Available.
- The contacts of the Back Office address book are edited the same way, from their own form.
Assign a Contact's Attributes in the Self-Serve Portal
A Self-Serve user manages the attributes of their own contacts from the same Attributes section, in the contact form of the portal's address book, with one restriction: only the attributes whose Visible For Self-Serve is Yes are offered.
How Account and Contact Attributes Reach an Order
Attributes placed on an account and on contacts are what makes an order arrive already tagged.
- A new order inherits the attributes of its account, of its pickup contact and of its delivery contact. They are offered checked in the Attributes card of the order, and can be unchecked before the order is saved.
- Only the attributes that are active at that moment are inherited: an attribute whose Start Date is in the future, or whose End Date has passed, is left out.
- An inherited attribute is offered on the order even when the attribute is not marked available for Orders.
- Changing the attributes of an account or of a contact does not change the orders already created. It applies to the orders created afterwards.
Assign Attributes to a Driver
A driver's attributes state what that driver has. They are the driver side of every dispatch comparison, and they show as coloured flags on the dispatch board.
A driver uses the same picker as an account and a contact, without the Start Date and End Date columns, which are offered on accounts and contacts only: see Use the Two-Column Picker.
- Navigate to Drivers, then click the driver.
- In the Attributes panel, click Edit:
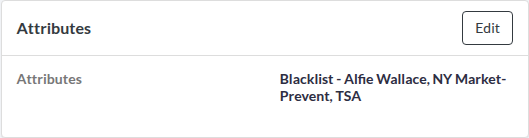
- Select an attribute in the list of available attributes and move it to the list of selected attributes:
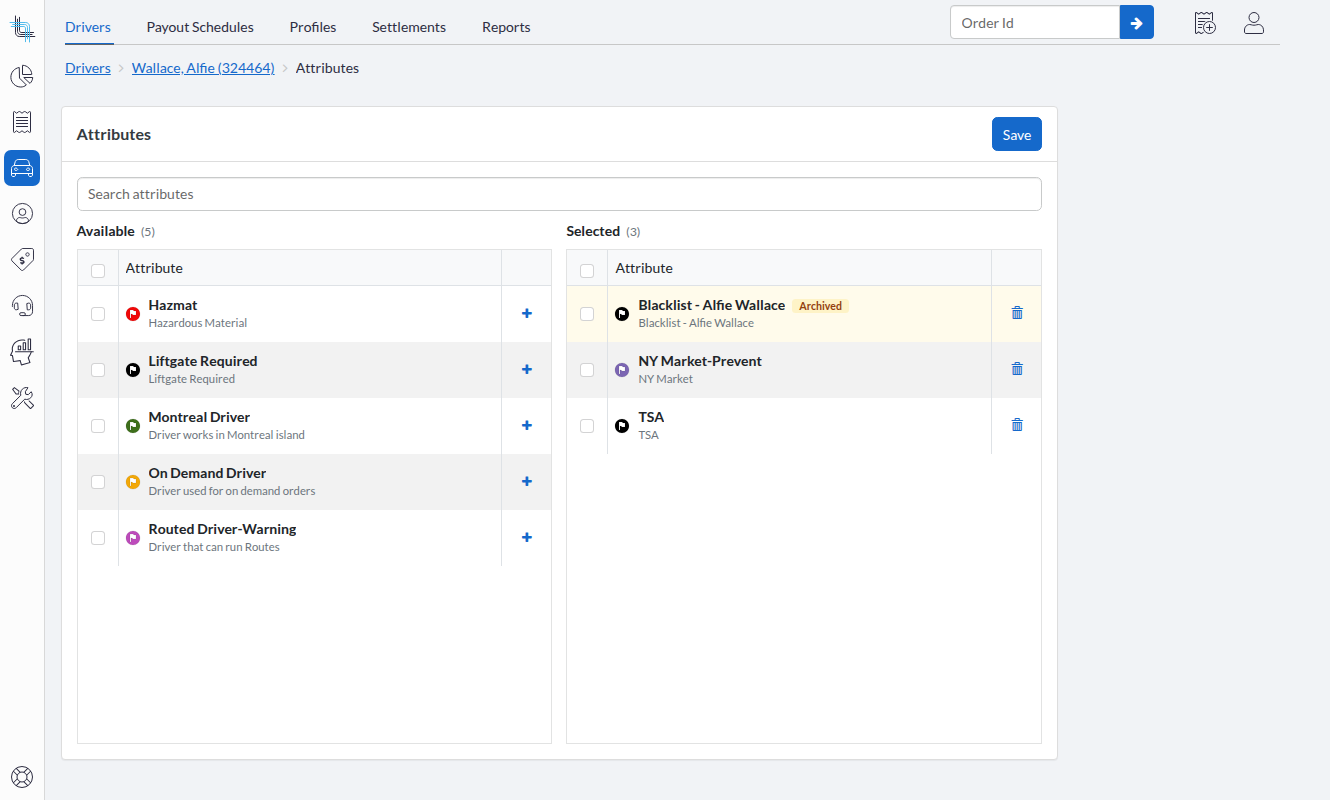
- Repeat until the selected list matches what the driver has:
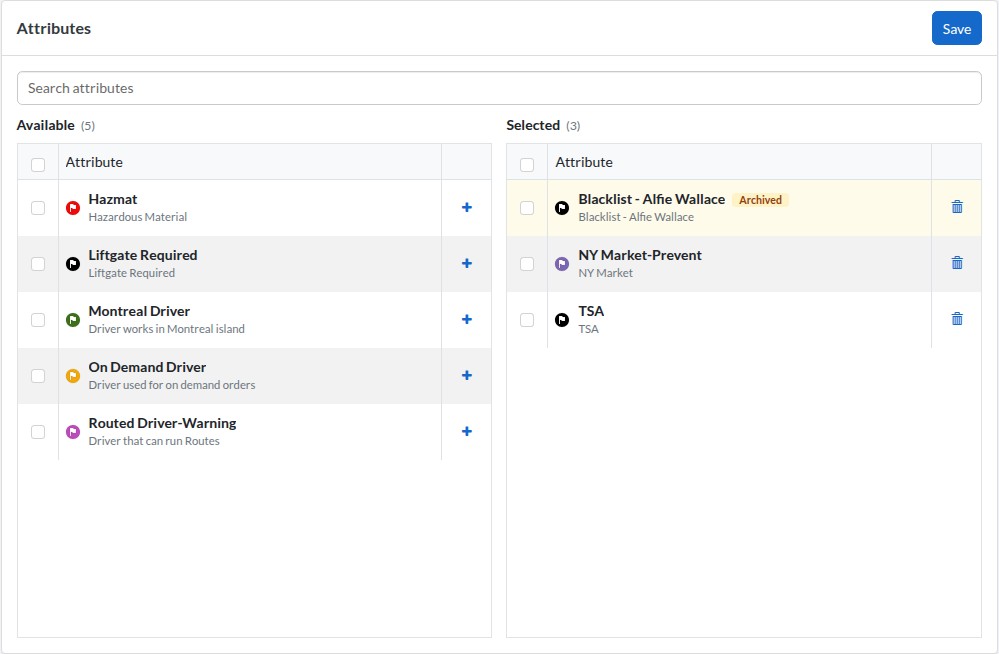
- Click Save. The driver record reappears with the message "Driver attributes were successfully updated".
What the screen offers you:
- Only attributes whose Type is Driver or Order and Driver are listed. An Order attribute can never be given to a driver.
- Each entry shows a flag in the attribute's colour, the attribute name and its description.
- An archived attribute is listed only when the driver already has it, and it is marked as archived, so you can remove it.
- The Attributes panel of an archived driver has no Edit button, so the attributes of an archived driver cannot be changed.
Assign Attributes to an Order
An order's attributes state what the delivery needs. They are the order side of every dispatch comparison, and they show as coloured flags on the dispatch board.
Add Attributes While Creating an Order
- Create an order in the Back Office.
- In the Attributes card, type in the search box to filter the list on a name or a description.
- Check the box of each attribute the order needs.
- Save the order.
The card offers the attributes that are not archived, whose Type is Order or Order and Driver, and that are marked available for Orders, plus those inherited from the account, the pickup contact and the delivery contact. The list is sorted by name, and the inherited attributes arrive already checked. A Self-Serve user is offered only the attributes whose Visible For Self-Serve is Yes.
Change the Attributes of an Existing Order
- Open the order and click Edit in the Attributes section.
- Check the attributes to add and uncheck the attributes to remove.
- Click Save, or Cancel to abandon the change.
Edit is offered only while the order and this section can still be modified. An order with no attribute checked displays the warning "No attribute selected" outside edit mode.
An attribute already on the order stays listed and checked even after it has been archived or made unavailable, so that it can be unchecked. On an order template, such a row carries a warning icon that explains: "The attribute has been removed or is no longer valid due to its expiration date and will not be added to the order at creation." Duplicating an order leaves the archived attributes behind.
Change the Attributes From the Dispatch Board
- On the dispatch board, open the order's actions menu.
- Click Attributes. The Attributes dialog opens with the search box ready.
- Check and uncheck the attributes, then click Save. If nothing changed, the dialog just closes.
The dispatch board never offers an archived attribute, and its lists are sorted by name.
Read the Coloured Flags
An order or a driver that has one or two attributes shows one flag per attribute, in the attribute's colour. Above two, a single black flag is displayed instead, showing the letter x followed by the number of attributes.
Hovering over the order or the driver lists the names of the attributes behind the flags; opening the order or driver details panel lists the names with their descriptions.
Impact of Attributes on Dispatch and Adjacent Screens
Only an attribute whose Type is Order and Driver and whose Dispatch Option is not Allow takes part in the checks below. Each check compares the attributes of the order with the attributes of the driver.
Dispatching Orders to a Driver From the Dispatch Board
When a dispatch option prevents the dispatch, a dialog lists the reasons. It is titled Cannot Dispatch, with only an OK button, when no order can be dispatched, and Some orders won't be dispatched, with Dispatch and Cancel, when others can still go through.
The reasons come in three families, each on its own line, followed by the attribute names and the orders concerned:
- "The selected driver does not have the following attribute(s)": the order has the attribute and the driver does not.
- "The following attribute requirements are not fulfilled": the order and the driver both have the attribute.
- "The selected driver does have the following attribute(s)": only the driver has the attribute.
A warning option prevents nothing, but it does require an explicit confirmation. A Confirm Dispatch dialog lists the same three families; click Dispatch to continue, or cancel to abandon the dispatch.
When one dispatch raises both prevented and warned results, the prevention dialog is displayed first and the confirmation dialog follows.
Creating an Order With a Driver Already Assigned
The order is created even when a dispatch option prevents the driver from being assigned. Only the assignment is prevented: the order is saved, then reopened in edit mode with a warning banner at the top explaining why the driver was not assigned.
The banner line names the attributes concerned and reads "Order cannot be assigned. The following attribute(s) are required:" when the driver is missing an attribute the order has, "Order cannot be assigned. The following attribute requirements are not fulfilled:" when both have it, or "Order cannot be assigned. The following attribute(s) are preventing:" when only the driver has it. Beyond ten warnings, the banner ends with the number of warnings not listed.
A Self-Serve user gets no attribute-related message here: the order is simply created without the driver.
Automatic Dispatch
Automatic dispatch compares the same attributes, but it has no dialog. A driver that fails a restrictive dispatch option is removed from the candidates for that order, and the reason is written to the optimization job comments instead of being displayed. Five of the seven dispatch options are restrictive for automatic dispatch, as listed in Choose the Right Dispatch Option.
Routes
- On the routes screen, the route line's tooltip lists the attribute conflicts between the allocated driver and the route's orders, together with the driver and document problems, and it decides whether dispatching the route is prevented or only warned.
- Dispatching one route displays "Cannot dispatch route" when attributes prevent it, or asks "Dispatch route?" when they only warn. A whole route container uses the plural forms and names the routes concerned instead of the orders: "On the following routes, the allocated driver has attribute conflicts with the route's orders:".
- Moving orders into a route uses the same three families of messages, in a dialog titled Cannot move to route when no order can be moved, Some orders won't be moved to the route when some can, and Confirm move to route when the attributes only warn.
- Attributes are checked only when the route is already dispatched and has an allocated driver. Moving orders into a route that is not dispatched, or that has no driver, is never prevented by attributes.
Order Transfers in the Driver App
A transfer of orders to another driver is prevented when a dispatch option prevents the receiving driver from taking them. The driver reads "Orders cannot be transferred because some orders of the driver are missing one or more required attributes." when the receiving driver is missing an attribute the orders have, "Orders cannot be transferred because some orders of the driver do not fulfill attribute requirements." when both sides have it, or "Orders cannot be transferred because the driver has one or more attributes that prevent the transfer." when only the driver has it.
Archive an Attribute
Archiving takes an attribute out of use without deleting it. Attributes cannot be deleted, so archiving is the way to retire one, and it can be undone at any time.
- Navigate to Settings > Configurations > System > Attributes and click the attribute's Id.
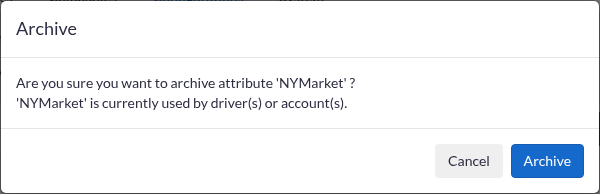
- Click Archive. The confirmation dialog opens:
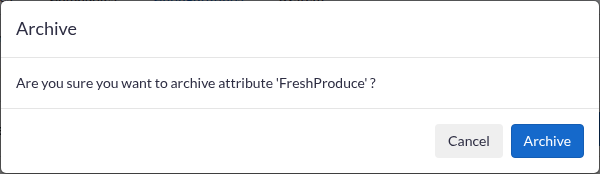
- Click Archive in the dialog. Clicking Cancelinstead closes the dialog and nothing is archived.
- The Attributes list reappears, and the attribute you just archived is no longer listed unless Show Archived is checked.
When at least one driver or one account has the attribute, the dialog adds a line saying that the attribute is currently used by drivers or accounts. Contacts and orders are not part of that check, so an attribute used only on contacts or only on orders produces no such line:
If the operation fails, the attribute is not archived: the screen stays on the attribute with the confirmation dialog open, and the Attributes list is not displayed.
What Archiving Changes
- The attribute is no longer listed in the Attributes list unless Show Archived is checked, and its row then carries the archive icon.
- It is no longer offered when choosing attributes: not on a new order, not in the dispatch board's lists, and not on the driver Attributes screen unless the driver already has it.
- It is ignored by manual dispatch validation. It stops preventing and stops warning on board dispatch, on route dispatch, when orders are moved into a route, when an order is created with a driver, and on driver app transfers, even though orders and drivers still have it.
- Its configuration can no longer be changed: an archived attribute offers only Unarchive, with no Save and no Archive button.
What Archiving Keeps
- Nothing is removed. Every driver, account, contact and order that has the attribute keeps it.
- The existing selections stay visible where they were made, flagged as archived or unavailable, so they can be removed one record at a time.
- Because nothing is removed, putting the attribute back in use restores it exactly as it was. See Unarchive an Attribute.
Unarchive an Attribute
Unarchiving puts an archived attribute back in use, with everything it kept while it was archived.
- Navigate to Settings > Configurations > System > Attributes and check the box for Show Archived, as described in Open the Attributes List.
- Click the archived attribute's Id.
- Click Unarchive.
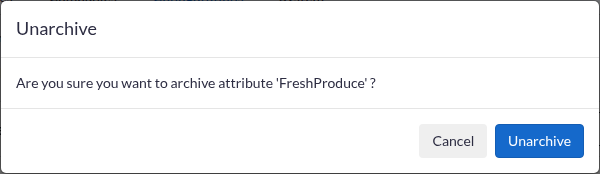
- Confirm in the dialog:
- The Attributes list reappears, and the attribute is listed again among the attributes in use.
The attribute is restored exactly as it was. It appears again in the list without Show Archived, becomes selectable again on orders, on drivers and on the dispatch board, counts in dispatch validation again, and the driver, account, contact and order associations it kept come back into effect. Nothing has to be assigned again, and its Save and Archive buttons are available once more.
If the operation fails, the attribute stays archived: the screen stays on the attribute with the confirmation dialog open, and the Attributes list is not displayed.
Was this article helpful?
That’s Great!
Thank you for your feedback
Sorry! We couldn't be helpful
Thank you for your feedback
Feedback sent
We appreciate your effort and will try to fix the article