New Features in This Release
- Improved whitelist / blacklist capabilities and other Attribute enhancements
- New public tracking page with live driver map and remaining stop count
- Multiple attachment support on invoice emails
- Ability for self-serve users to add or remove attachments on orders
- Route planning & Auto-Dispatch enhancements
- Enhanced metadata access for Developer Toolkit & Tenant API improvements
The release notes refer to different sections of the application. You can consult their definitions below :
Definitions — click to expand
- Back Office
- Where Customer Service Representatives (CSR) create and edit orders, create accounts, review drivers, etc.
- Dispatch Board
- Where Dispatchers assign orders to drivers, get notifications for invalid orders, etc.
- Auto-Dispatch
- This section refers to the automated order assignment setup and its process.
- Administration
- This section is in the Back Office but refers to sections only an administrator will use like Settings and Pricing.
- Customer Portal
- Where account users log in to create orders, view their order history, enter a credit card, etc.
- Tracking Site
- Where customers enter a tracking number like the order ID or a reference number to view the status of their order.
- OData
- Data fields and variables saved in OData.
- Account API
- API provided to your accounts to create, update and get orders. For documentation, see api.dispatchscience.com.
- Tenant API
- API provided to you to create orders for your accounts, retrieve invoices and change invoice status. For documentation, see api.dispatchscience.com.
Table of Contents
- Back Office
- Dispatch Board
- Self-Serve Portal
- Public Tracking Page
- Administration
- Scripts & Script Rules
- Tenant API
- Full Attributes, VehicleType, and ServiceLevel CRUD via Tenant API
- Driver Pay Rate Fuel Surcharge Schedule on Accounts
- Zone Data Added to Order Endpoints
- Webhook Subscriptions for Late ETA Notifications
- Order Status Endpoints – Idempotent Behavior Update
- Ad-Hoc Notification: Support for Additional Recipients
- Full Script Rules CRUD via Tenant API
- OData
BackOffice
Orders
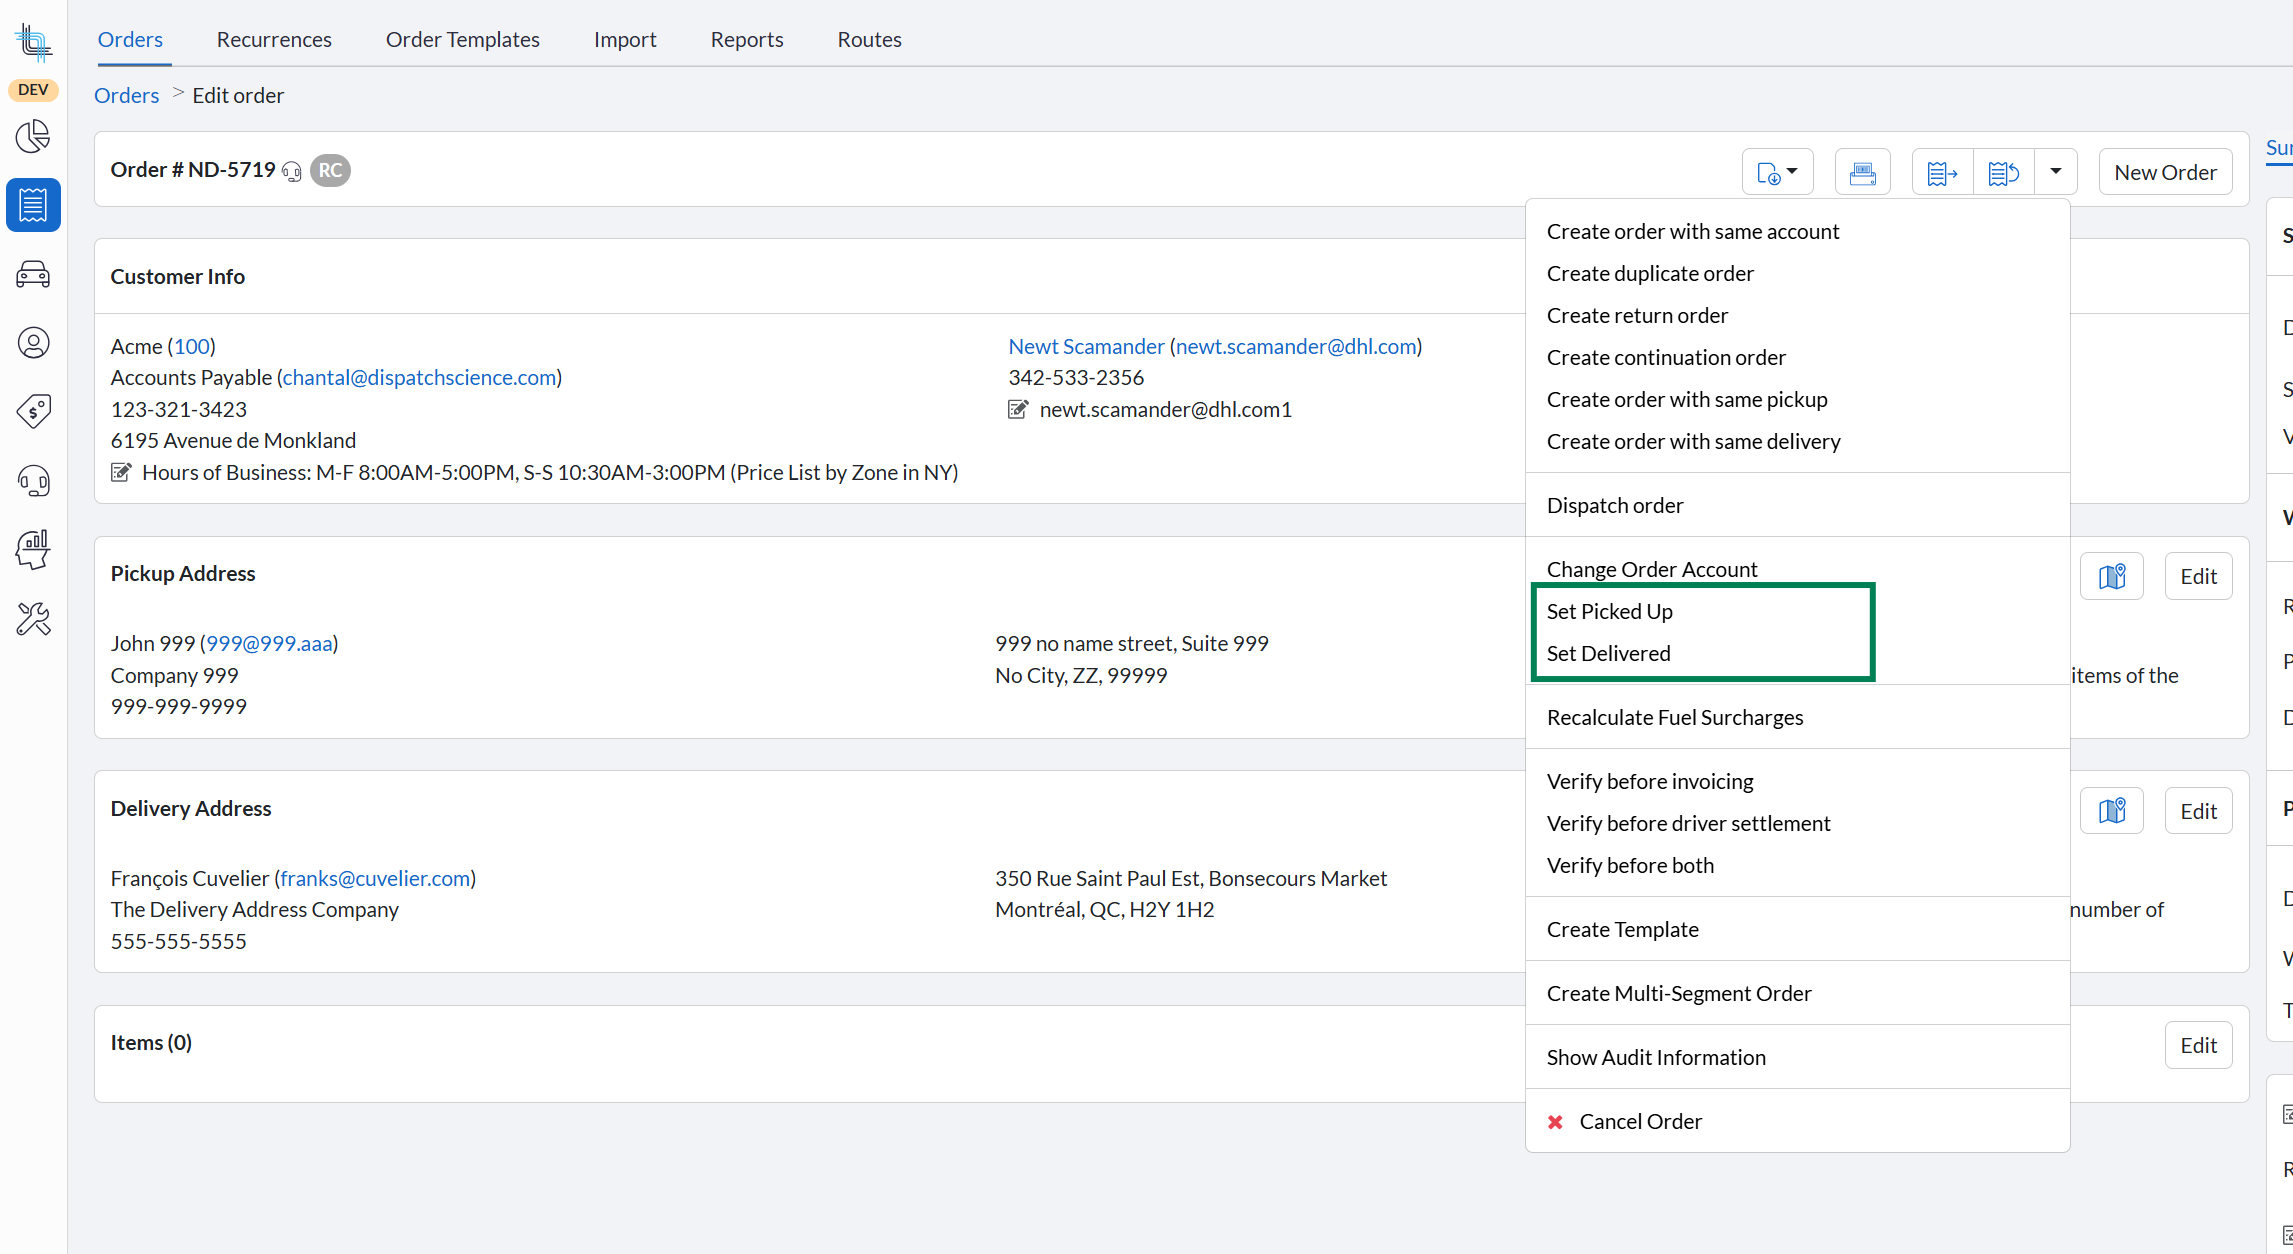
Ability to set orders as Picked-Up & Delivered from the BackOffice order screen
New actions — Set Picked Up and Set Delivered — allow orders to be marked as picked up or delivered from the BackOffice order screen. Edit Proof of Pickup and Edit Proof of Delivery options are available after the fact.
This feature enables back-office intervention to update critical milestones (Picked Up and Delivered) and revise proof of pickup when discrepancies occur, helping maintain accurate tracking, compliance, and customer visibility.
Set Picked Up
Available when the order has not yet been picked up and is not cancelled.
- Open the order in BackOffice.
- From the order action menu, select Set Picked Up.
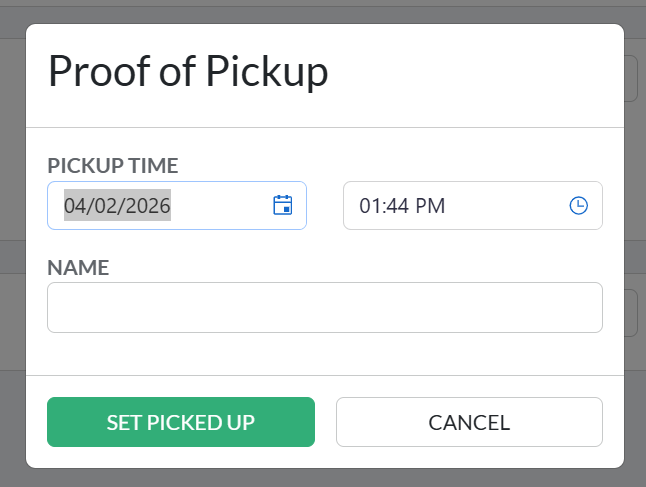
- Fill in the Proof of Pickup dialog box and confirm. Order status updates to Picked Up.
Set Delivered
From the order action menu, select Set Delivered
- Fill in the Proof of Delivery dialog box and confirm. Order status updates to Delivered.
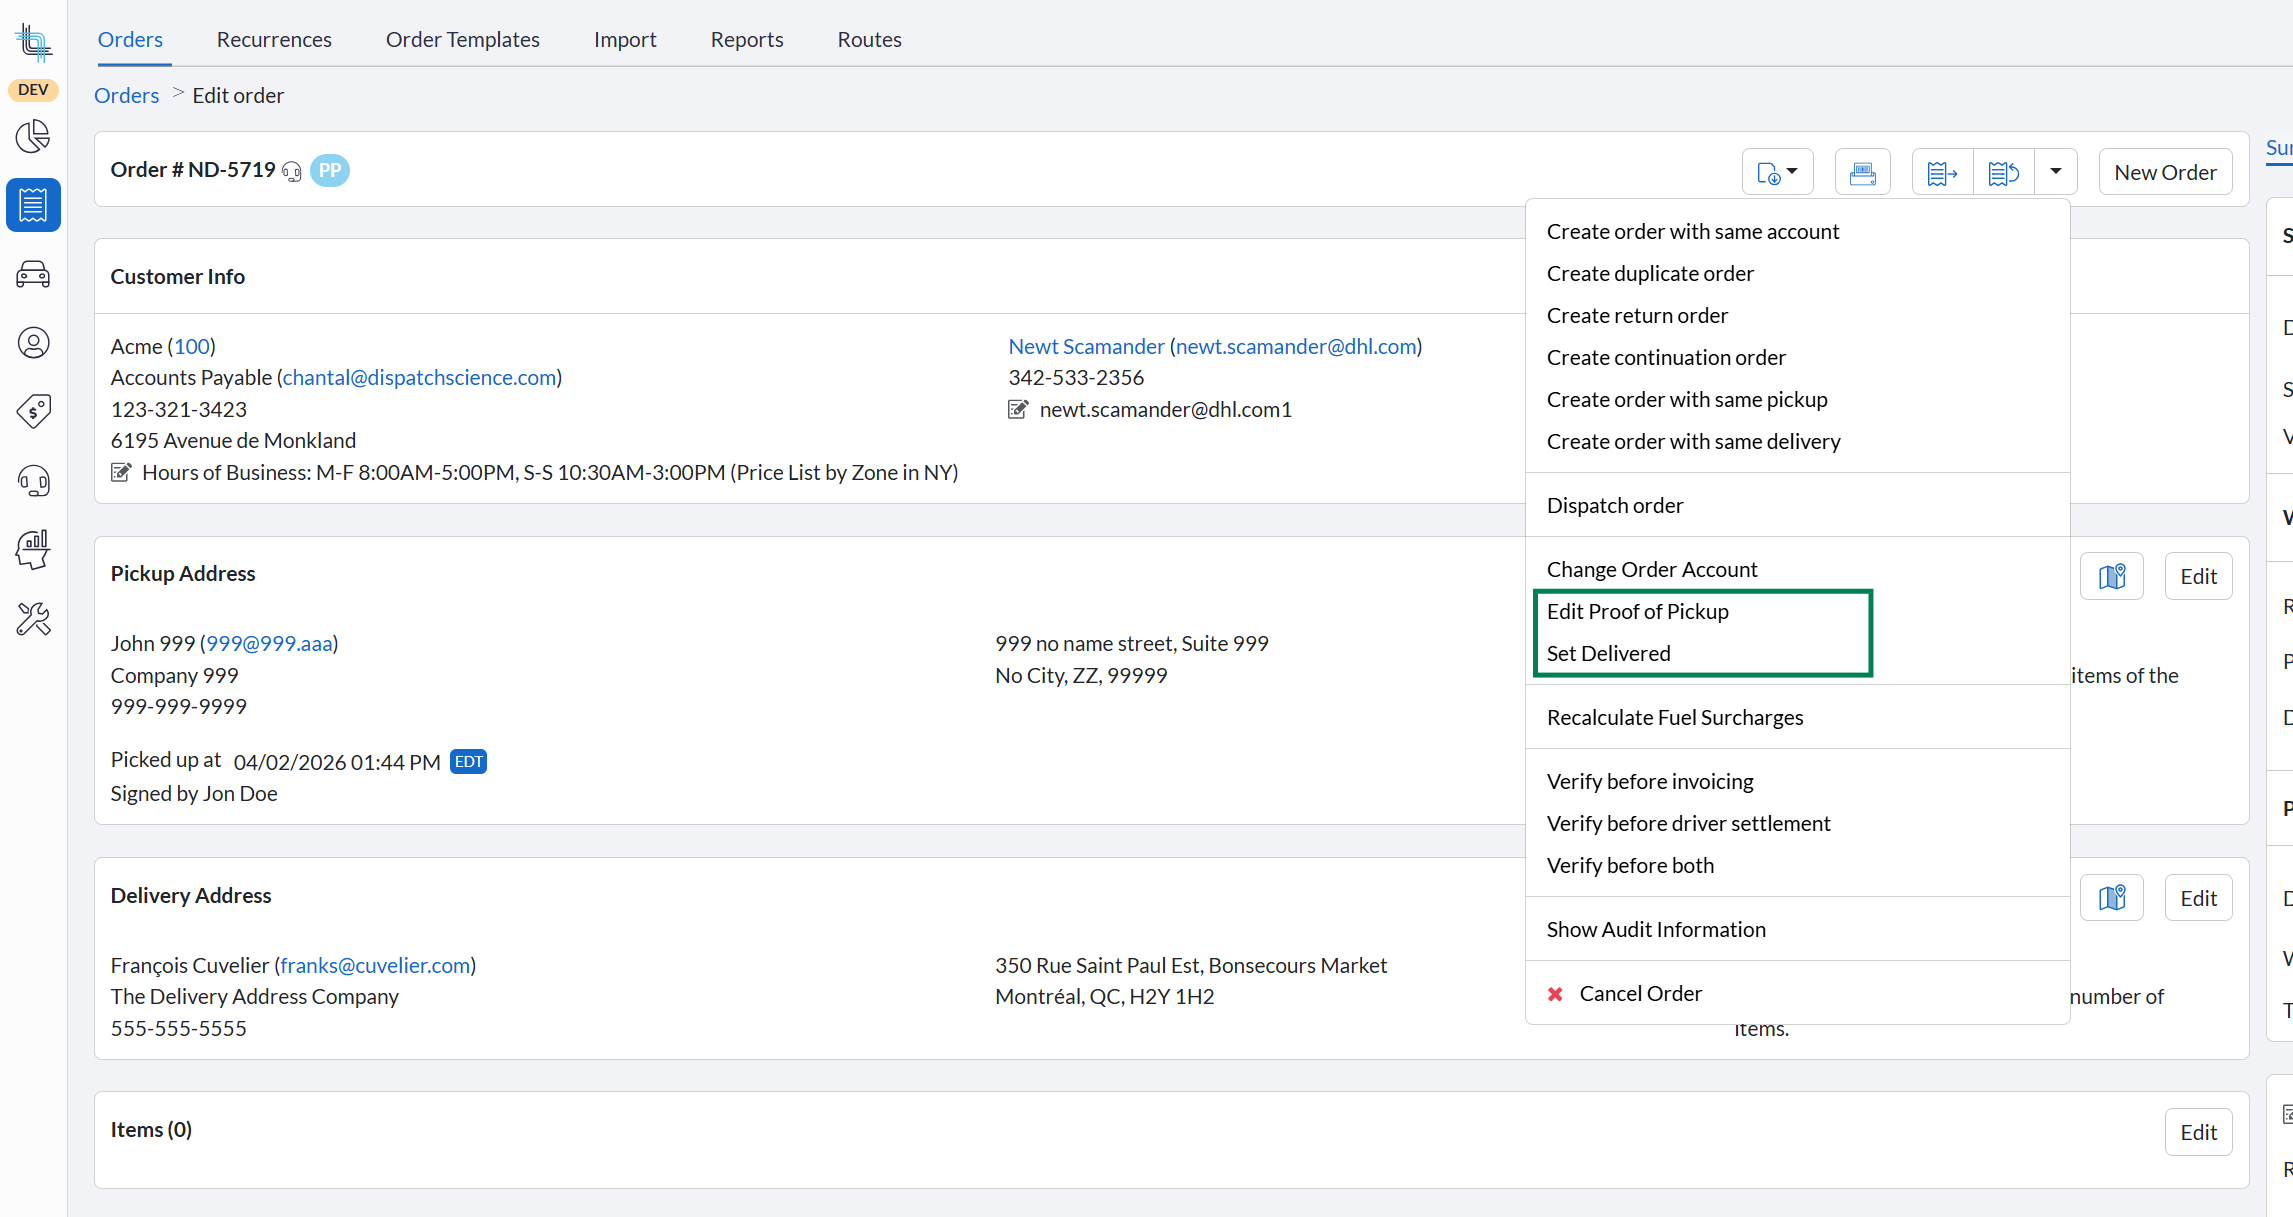
Edit Proof of Pickup / Edit Proof of Delivery
Once picked up or delivered, menu items change to allow editing the proof of pickup/delivery. A Remove Image option is available if a signature was captured.
Availability by Status
| Order status | Available actions |
|---|---|
| Not picked up, not cancelled | Set Picked Up & Set Delivered |
| Picked up, not yet delivered | Edit Proof of Pickup & Set Delivered |
| Delivered, not invoiced | Edit Proof of Pickup & Edit Proof of Delivery |
| Invoiced | No actions shown |
| Cancelled | No actions shown |
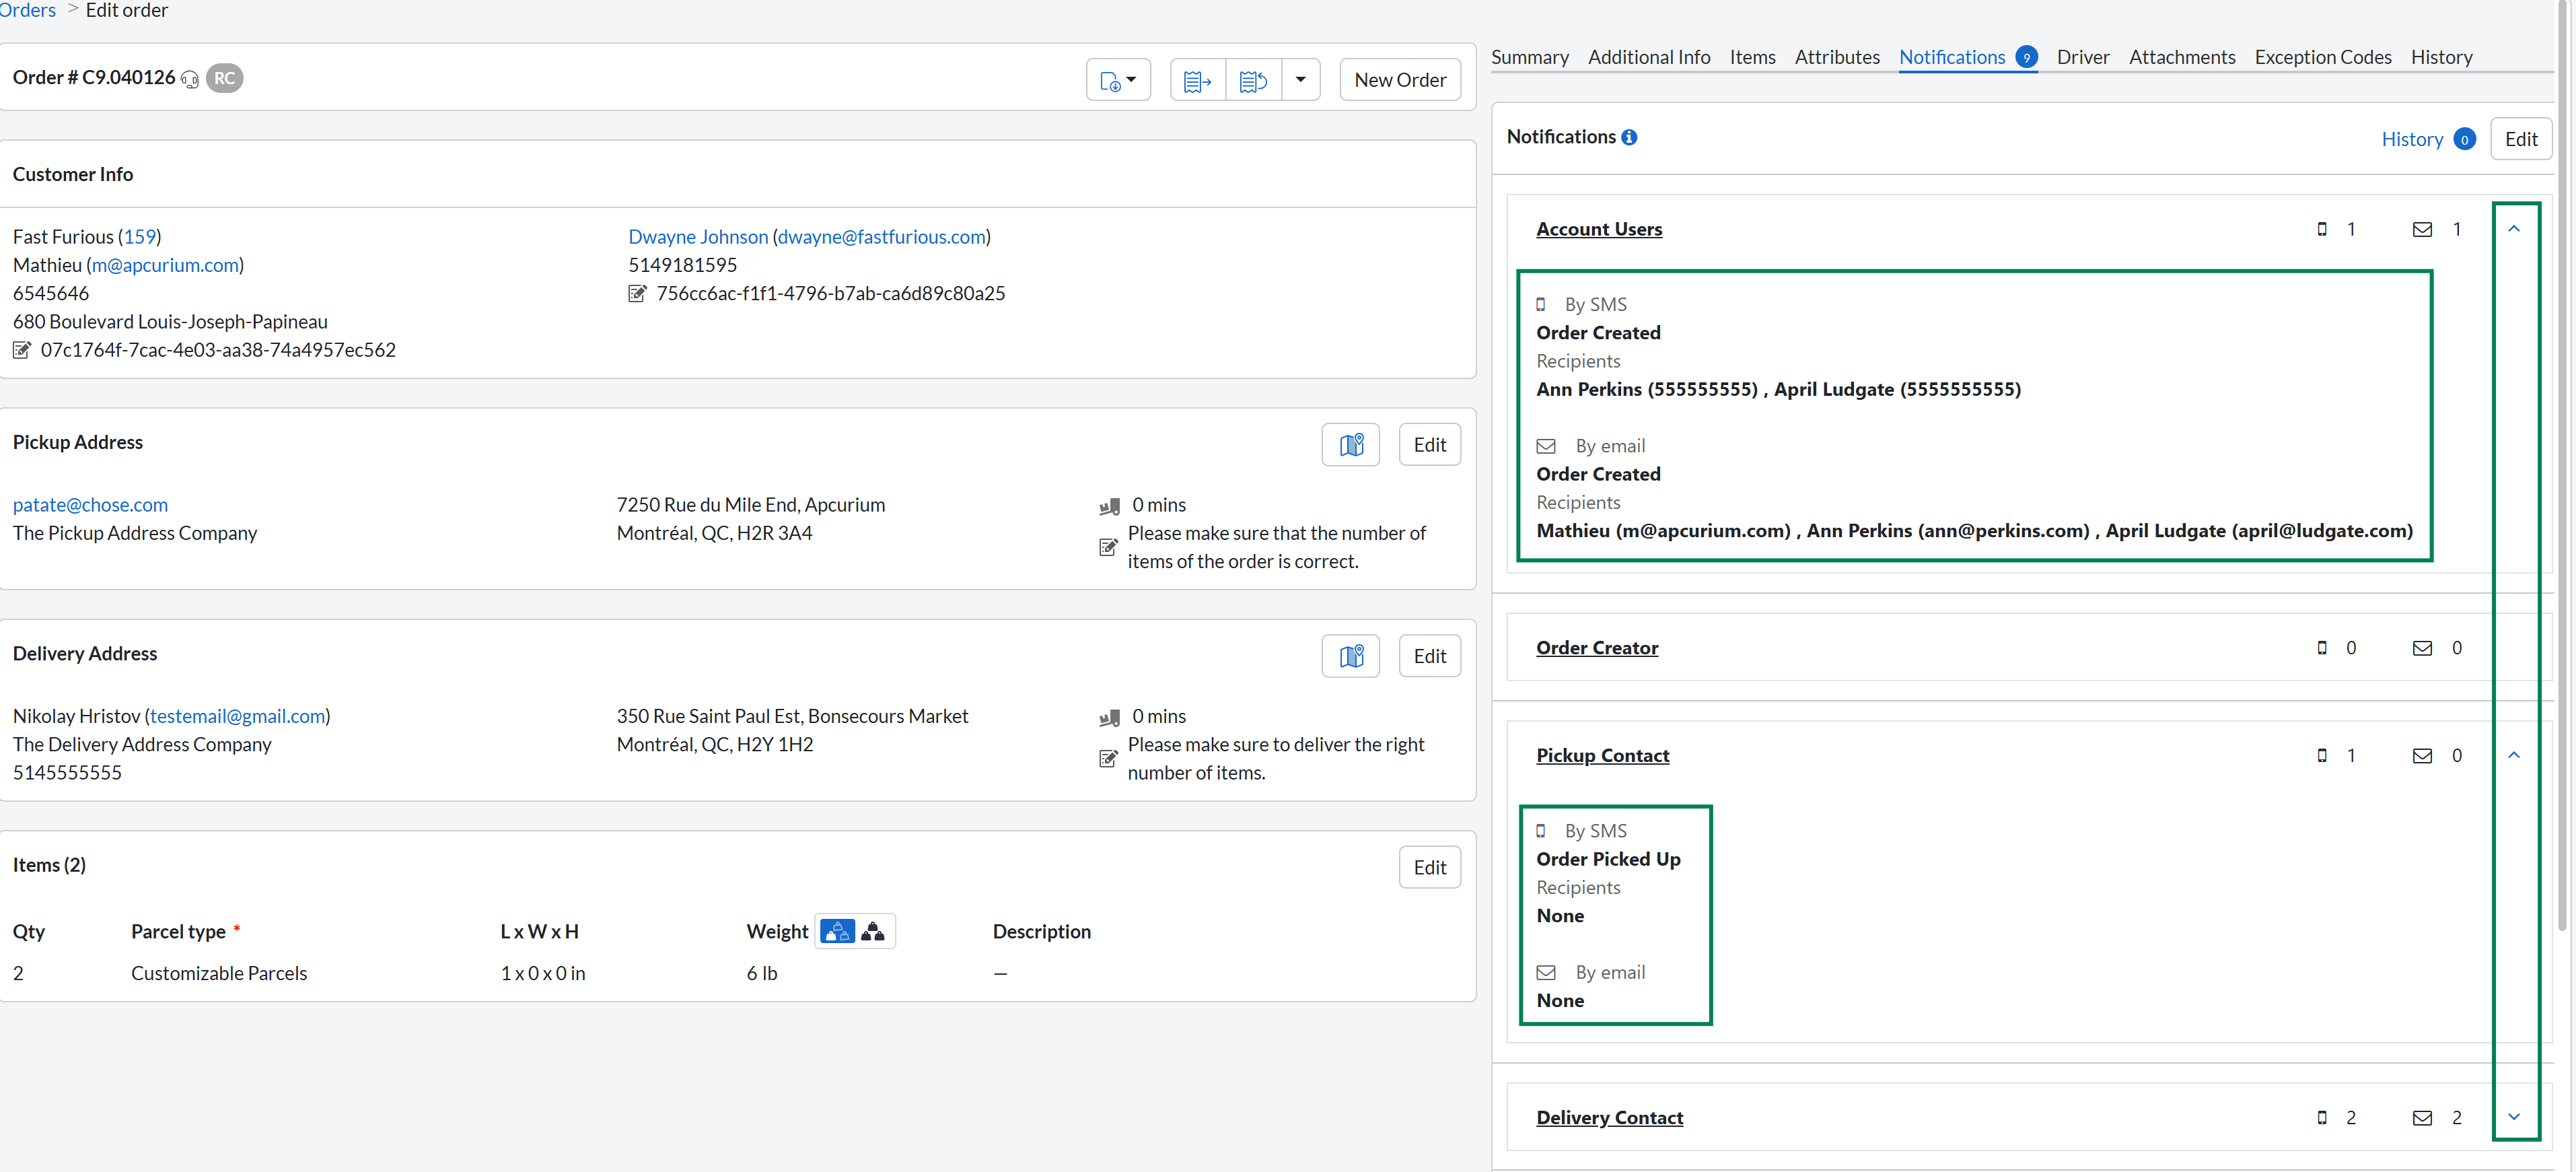
Order Notification Usability Improvements
The Account Contact label in the Order Notification section is now Account Users. Hovering over the ℹ️ or phone icon now displays the full list of recipients (name and email/phone).
Drivers
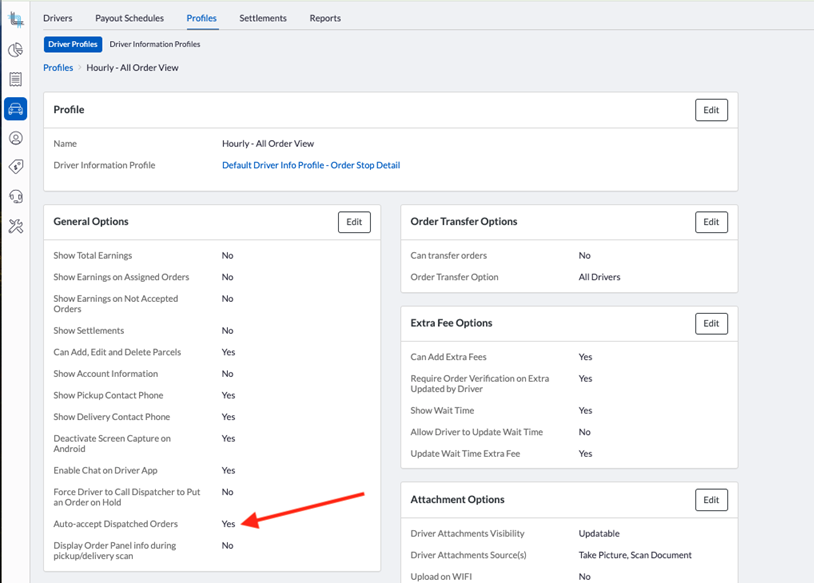
Auto-Dispatch enhancement for auto-accept orders
Auto-dispatched orders now use the Auto-accept setting from the driver profile to allow bypassing a manual confirmation by the driver.
This ensures that auto-dispatched orders respect driver preferences, reducing unnecessary confirmations and speeding up the assignment process.
The Auto-accept option is in the driver profile under General Information:
- Yes — order is assigned upon dispatch, no driver action required.
- No — driver can accept or reject as usual.
Driver History Permission Enforcement
Internal users without permission to view driver history now see an unauthorized access message instead of an error. No configuration change required.
Accounts
Multiple attachment support on invoice emails
Accounts can be configured with additional invoice templates. Its output is available in the invoice emails alongside the primary invoice via download links. It is also accessible from the Transactions list.
This enhancement ensures customers automatically receive all required supporting documents with their invoices, reducing follow-ups and improving clarity.
How to Configure
- Open the account in BackOffice and click Edit in the Billing Options tab.
If more than one invoice template is associated with the account, the list will show comma-separated.
- Locate the Additional Invoice Templates field.
- Click on Add template link to add a new field where you can select the additional invoice template.
Add as many rows as needed and select the desired template.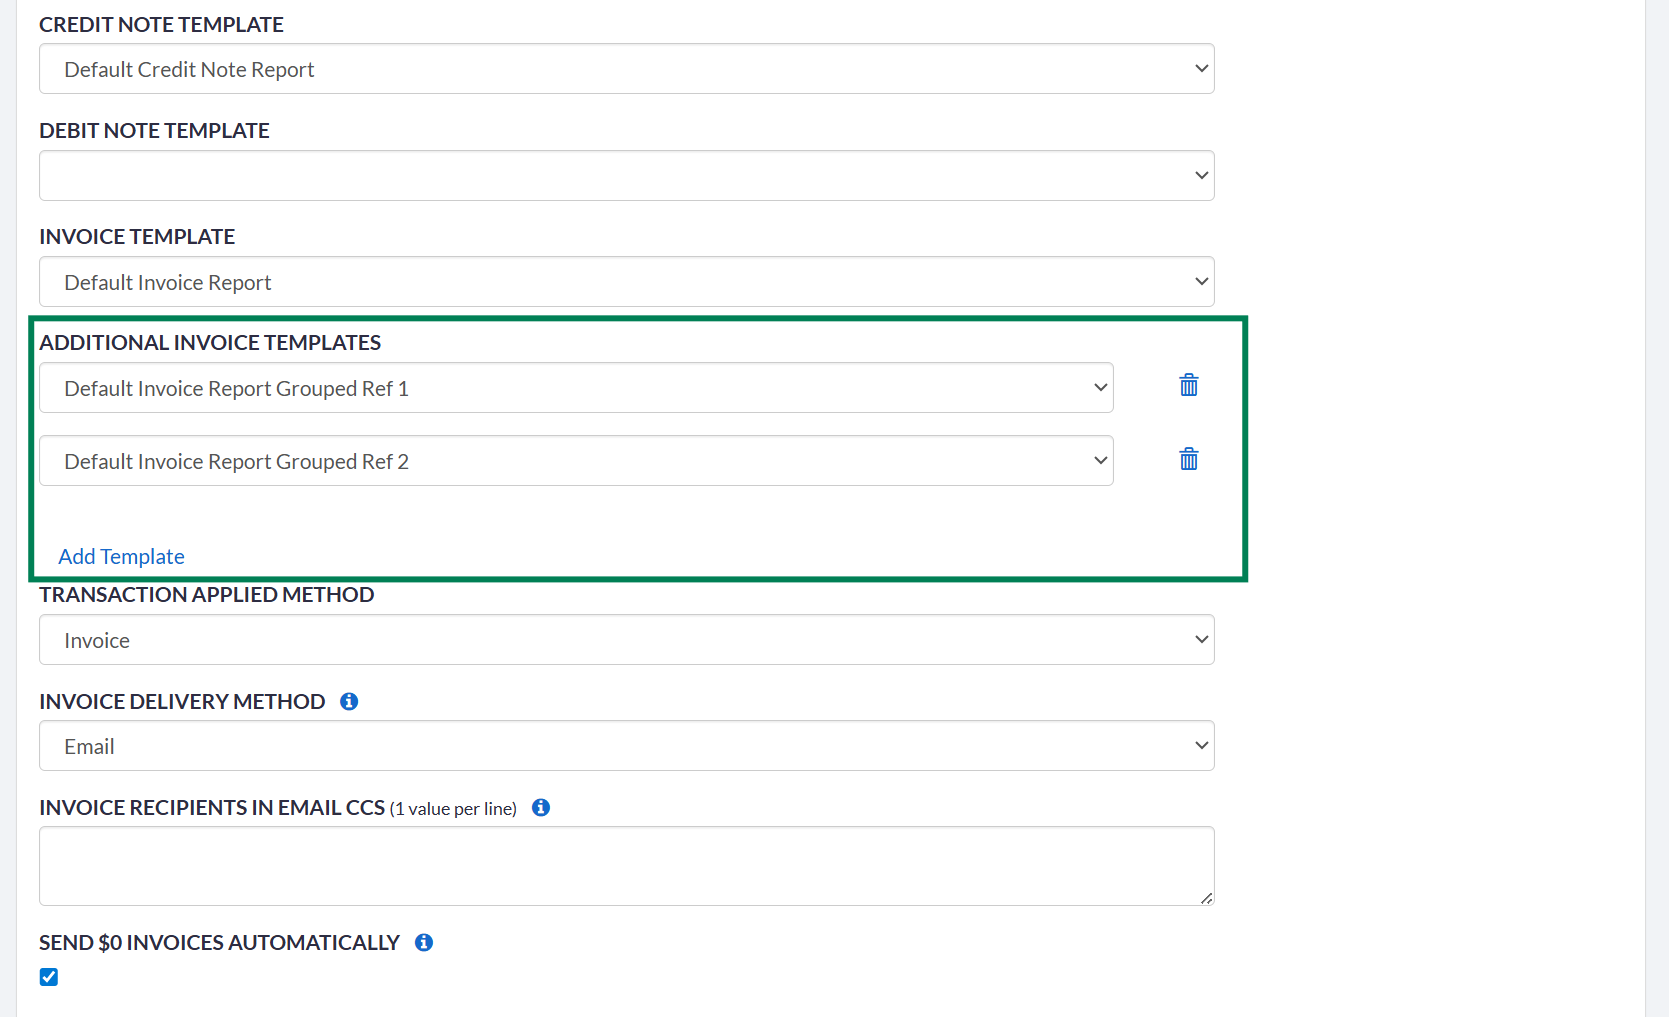
- Save.
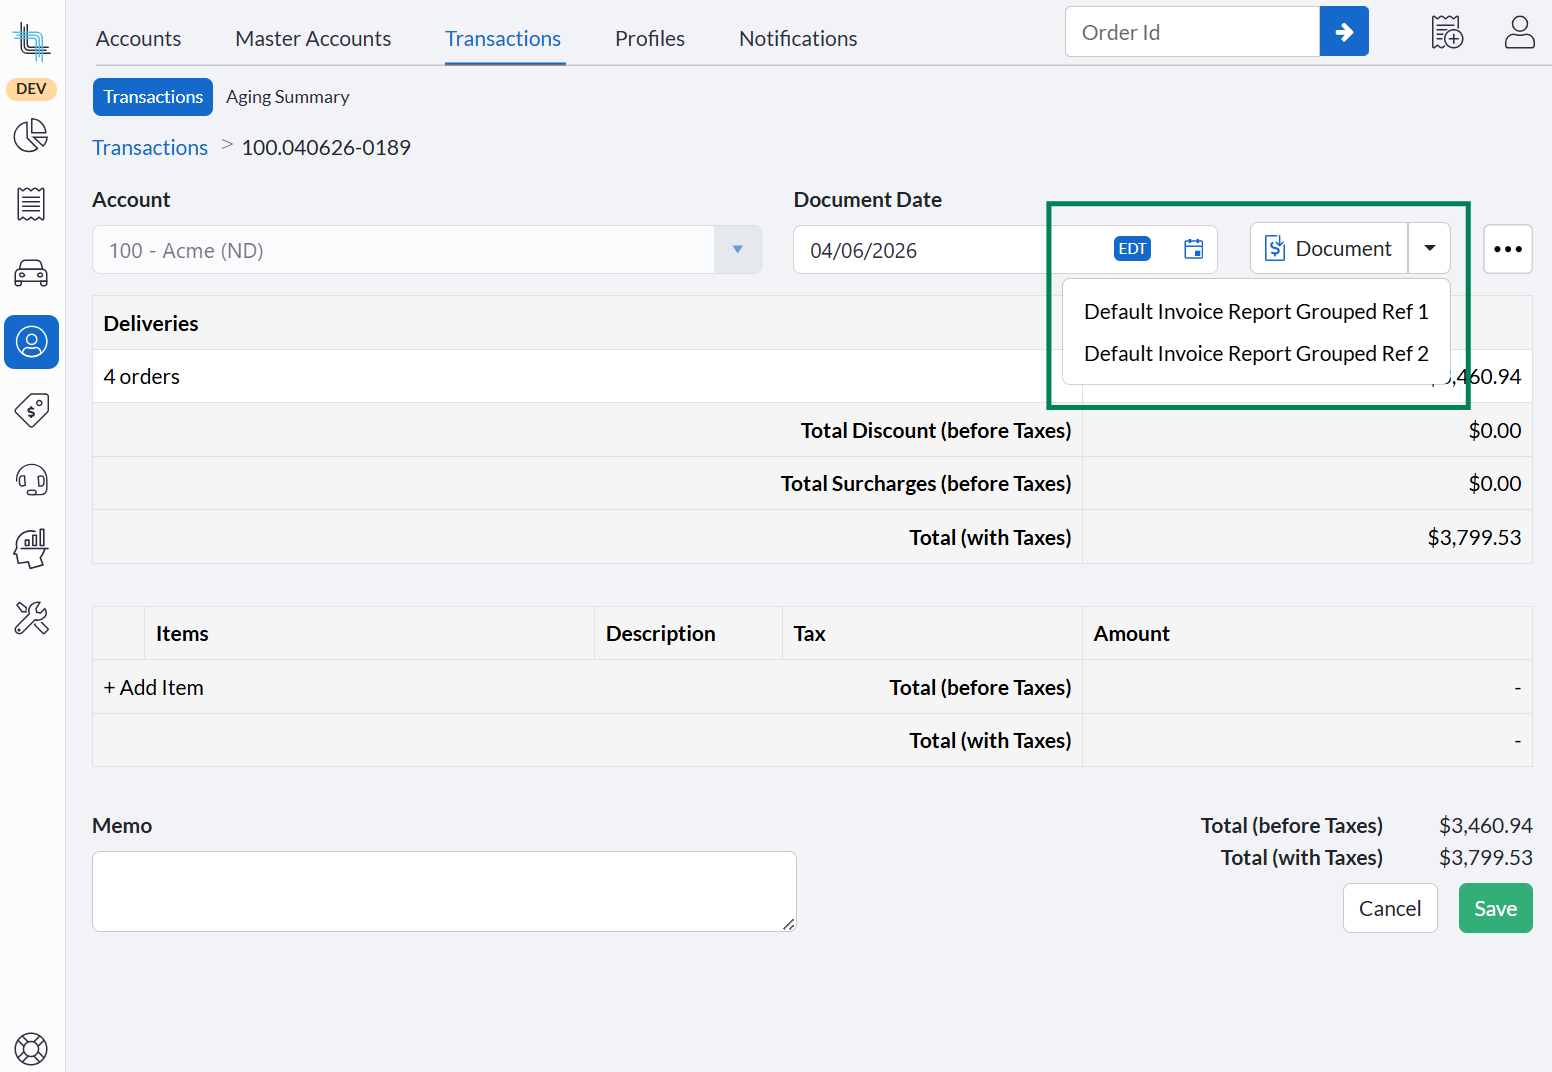
Download Additional Reports
- Generate the invoices as usual.
- On the Transactions Details screen of an invoice, the Document button will now allow the user to download the additional invoice reports, if configured. The same is also possible from the Transactions Search screen via the Invoice icon.

Ability to Copy Accounts
Accounts can be copied from the Account Details screen. See https://support.dispatchscience.com/a/solutions/articles/36000603462 for details.
This enables rapid onboarding of new accounts by duplicating existing configurations, helping maintain standardization, reducing data entry errors, and accelerating operational readiness.
Ability to Create New Account and Copy Account from Master Account
The master account screen gains two new features, Create New and Create from Existing, which allow faster sub-account creation. Refer to https://support.dispatchscience.com/a/solutions/articles/36000603463 for all the information.
Quickly set up new accounts by copying configurations directly from a Master Account, ensuring consistency across all accounts, reducing manual data entry, and getting new accounts operational faster.
Invoice Attachments Become Download Links
Invoice attachments are now delivered as download links instead of file attachments. This keeps emails lighter and reduces the risk of attachments being blocked by spam filters.
Dispatch Board
Routes
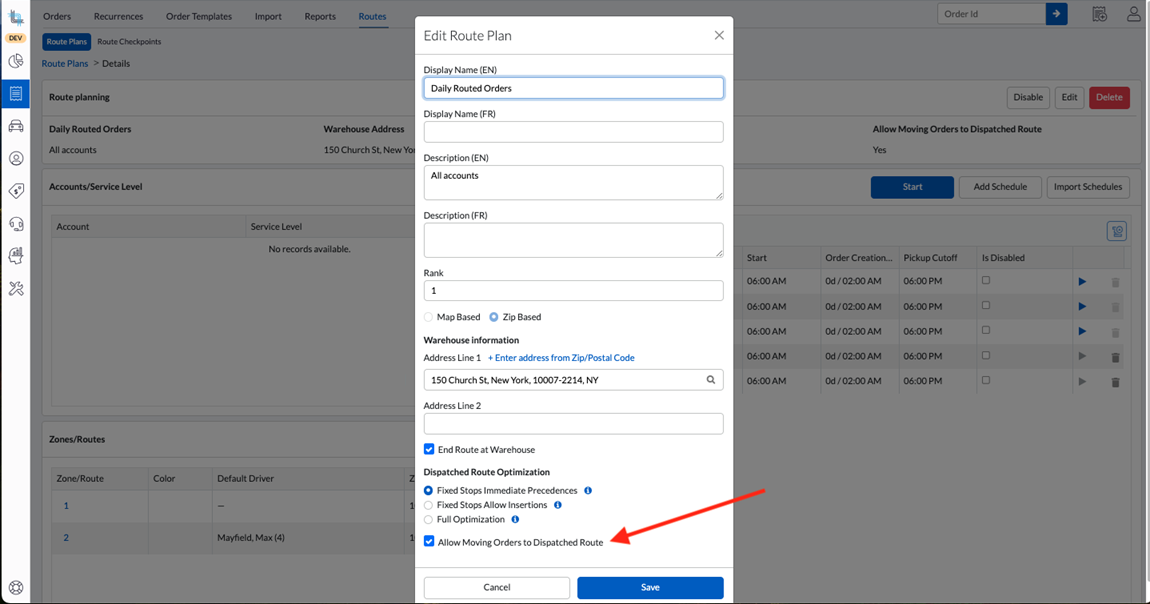
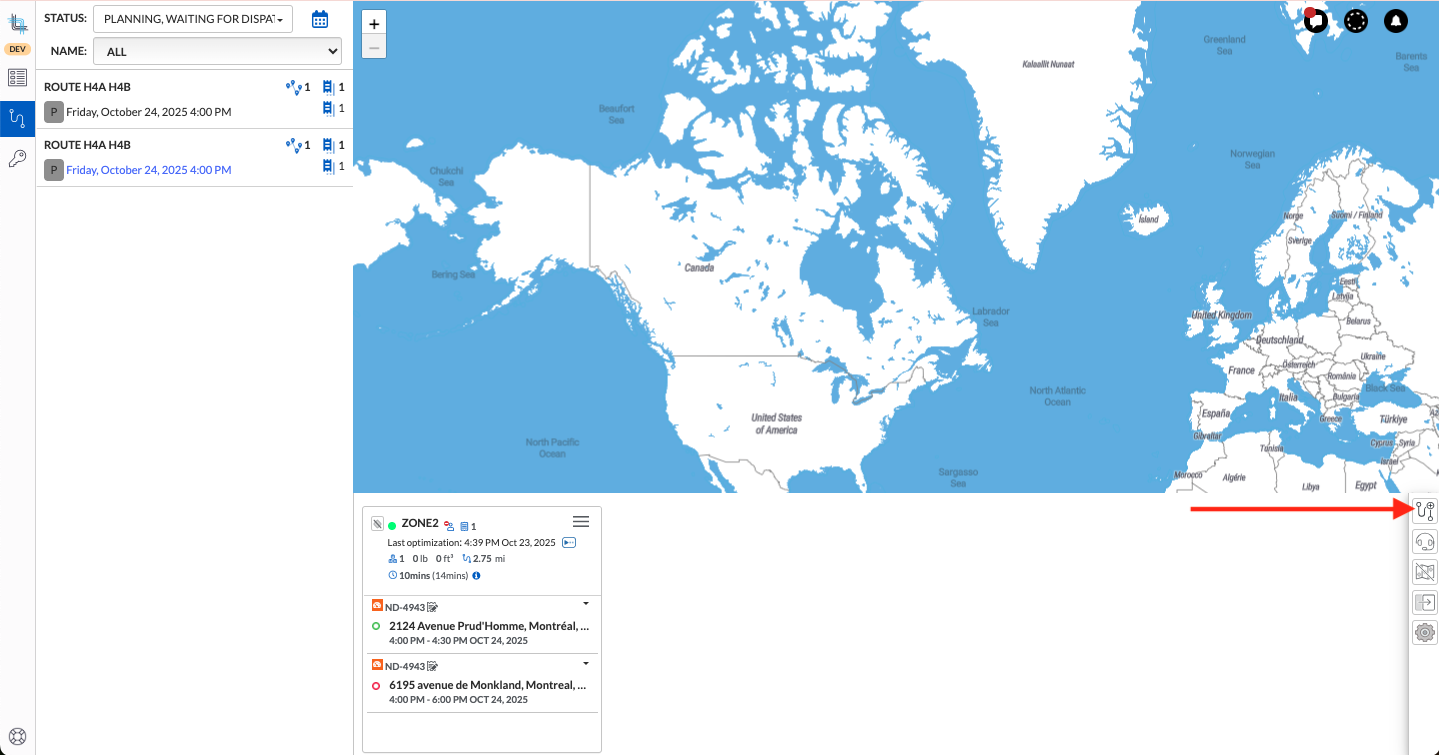
Manual routes can be added to already-dispatched containers
When Allow Moving Orders to Dispatched Route is enabled on a Route Plan, dispatchers can create manual routes on already-dispatched containers.
This allows dispatchers to reorganize and optimize routes even after containers have been dispatched, improving flexibility and operational efficiency.
- Open the dispatched Route Container on the Dispatch Board.
- Click Create new Route — now visible while the container is dispatched.
- Configure the new manual route.
- Move orders using Move to Route or drag and drop the orders to the new route.
Map Board
Map Board Performance Improvement
Map rendering has been optimized for drivers with a large number of stops — zooming and dragging the map is smoother and faster. Map marker clustering now scales progressively with zoom level, keeping the map smooth and responsive whether you're viewing a full city or navigating street by street, thus enabling faster decision-making and more accurate route management.
Self-Serve Portal
Self-serve users can add and delete attachments on orders
Self-serve users can add and delete attachments on orders when the corresponding role permissions are enabled.
This feature empowers users to maintain accurate and complete order records on their own, improving control, transparency, and overall satisfaction.
To learn how self-serve users can use those new features, please review https://support.dispatchscience.com/support/solutions/articles/36000132337#Managing-Attachments.
Public Tracking Page
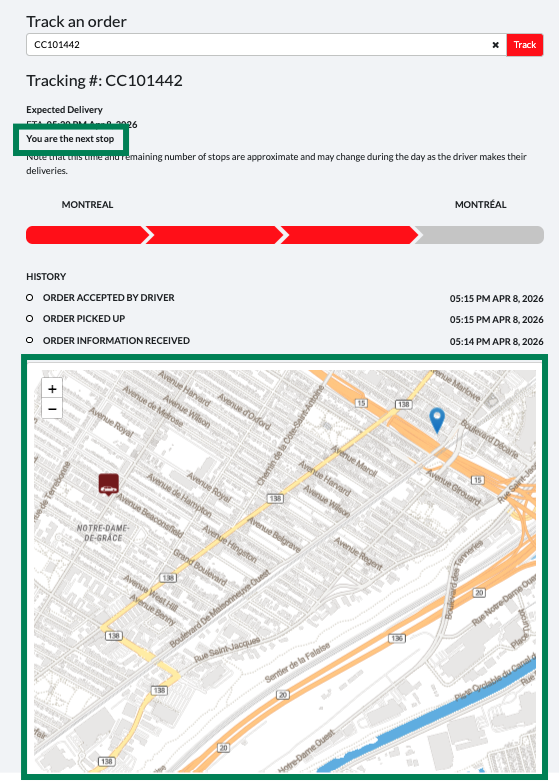
Improved public tracking page with live driver map and remaining stop count
The public tracking page can display a live map of the driver's position and the number of stops remaining before delivery. Configuration is done in the self-serve profile.
This feature allows configurable, profile-specific live tracking on the public page, giving customers up-to-the-minute information while supporting operational efficiency by reducing support calls and improving delivery predictability.
How to configure
- Go to BackOffice › Accounts › Profiles › Self-Serve Profiles and open the relevant profile.
- Click Edit in the new Public Tracking Page Options section.
- Enable Show map and/or Show remaining stops.
- Choose between displaying them from the order picked up or based on a given number of remaining stops.
- Save.
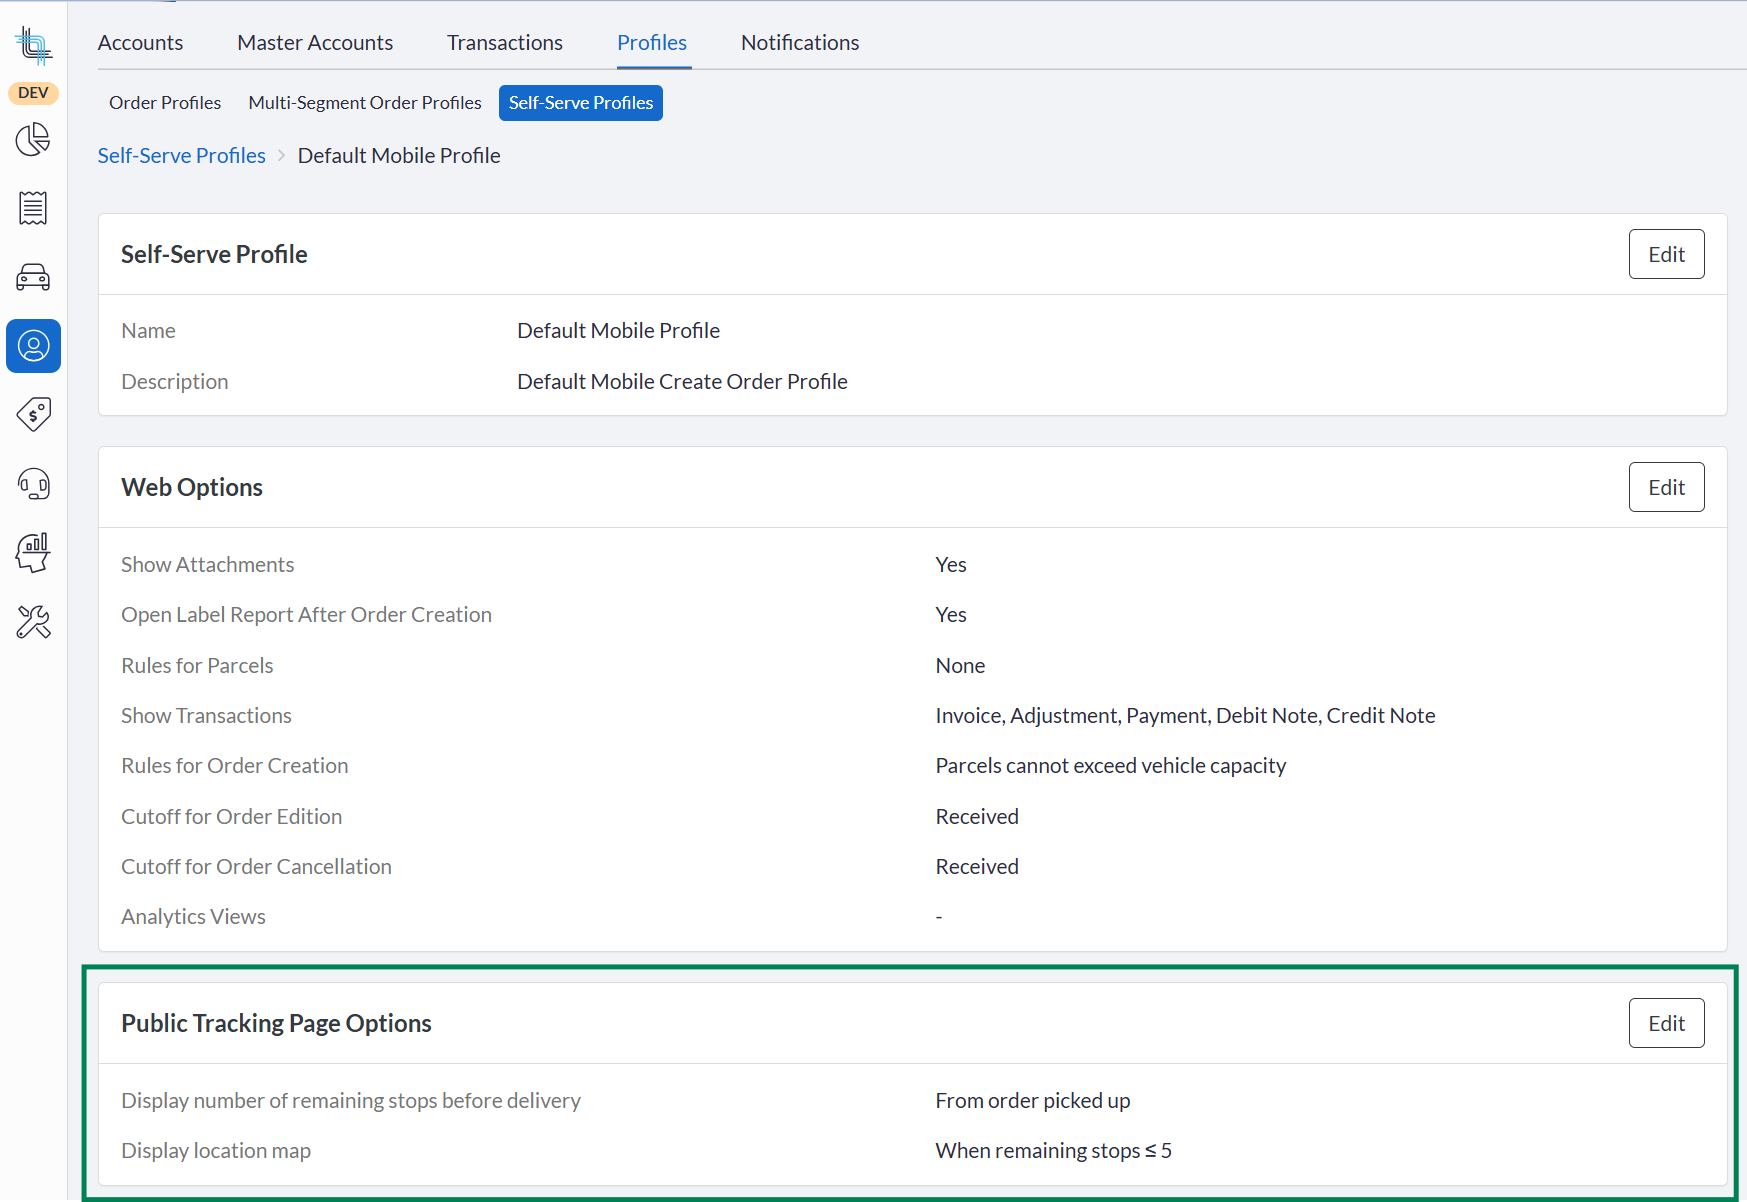
 The tracking page will then show the map and the remaining number of stops according to the configuration set on the account, and a number of other parameters. Refer to https://support.dispatchscience.com/a/solutions/articles/36000603335 for details.
Administration
New Permissions
Add, Edit & Delete Attachments on Orders for Self-Serve Users
Self-serve users can add, edit and delete attachments on orders when the corresponding role permissions are enabled. All are off by default to keep current functionality.
Admin setup — enabling permissions
| Permission | Location | Default |
|---|---|---|
| Orders › Add Attachments | Settings › Configurations › System › Roles → Actions | Off |
| Orders › Delete Attachments | Settings › Configurations › System › Roles → Actions | Off |
| Orders › Edit Attachments | Settings › Configurations › System › Roles → Actions | Off |
- Go to Settings › Configurations > System > Roles and open the role to update.
- Under Orders, enable Add Attachments and/or Delete Attachments and/or Edit Attachments.
- Save.
 To learn how self-serve users can use those new features, see https://support.dispatchscience.com/support/solutions/articles/36000132337#Managing-Attachments.
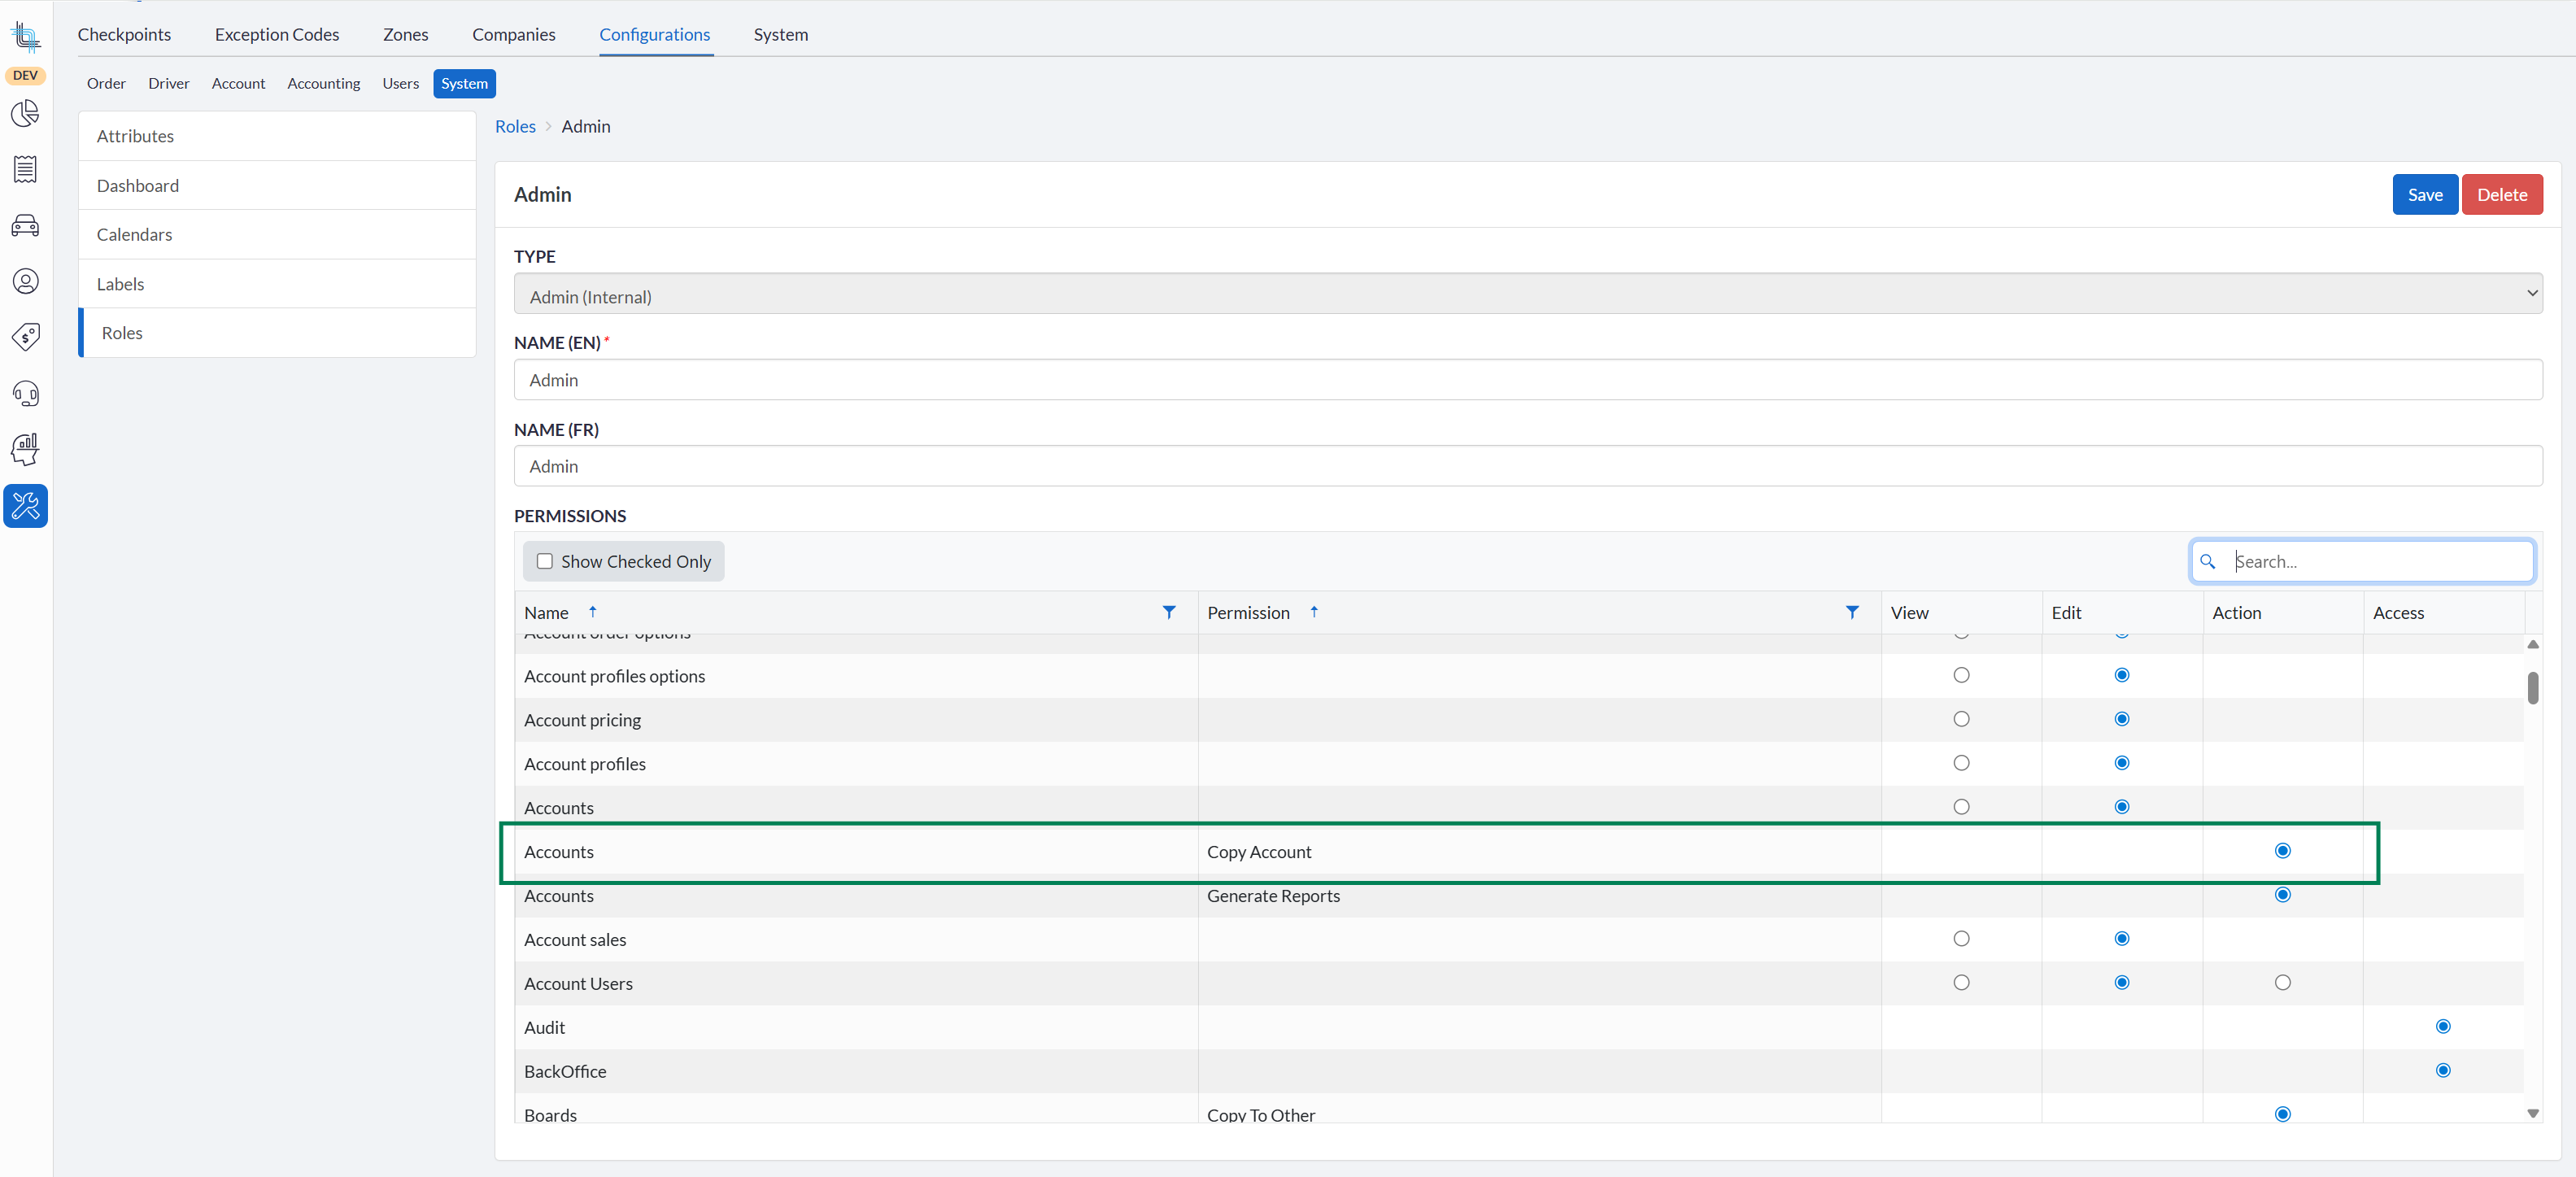
Copy Account for Internal Users
Internal users can now copy an account when the corresponding role permission is enabled. It is enabled by default for internal admins only.
Admin setup — enabling permissions
- Go to Settings › Configurations > System > Roles and open the role to update.
- Under Accounts, enable or disable Copy Account.
- Save
Attribute Enhancements featuring new availability options; Contact-level attributes, new dispatch triggers
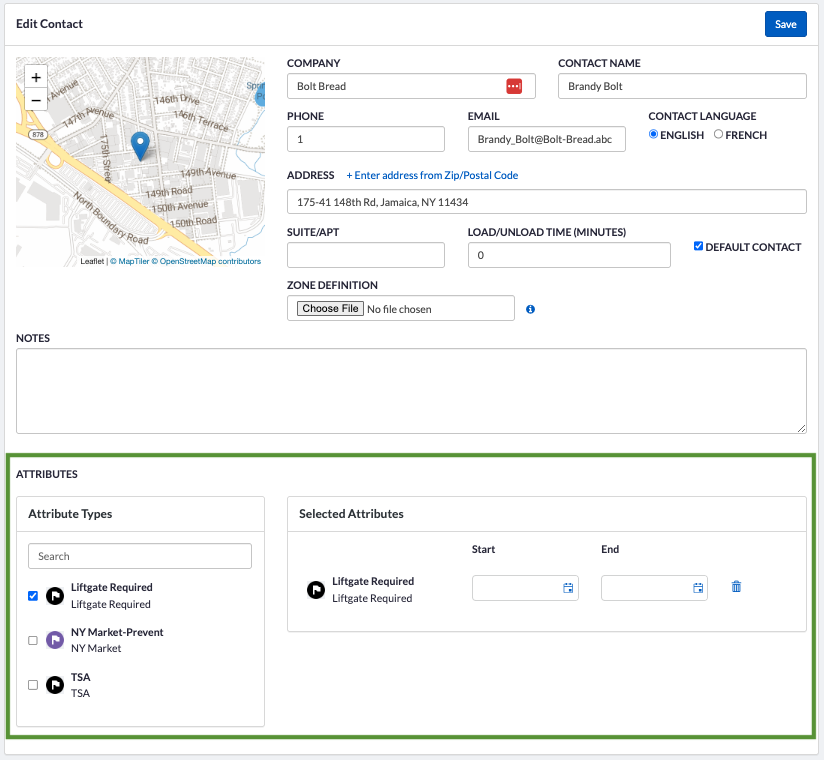
Attributes can now be assigned directly to contacts, in addition to accounts and orders. Assigning an attribute to a contact or an account will display it on related orders. If either is later removed, the attribute is also removed from the order, ensuring accurate inheritance when accounts or contacts change.
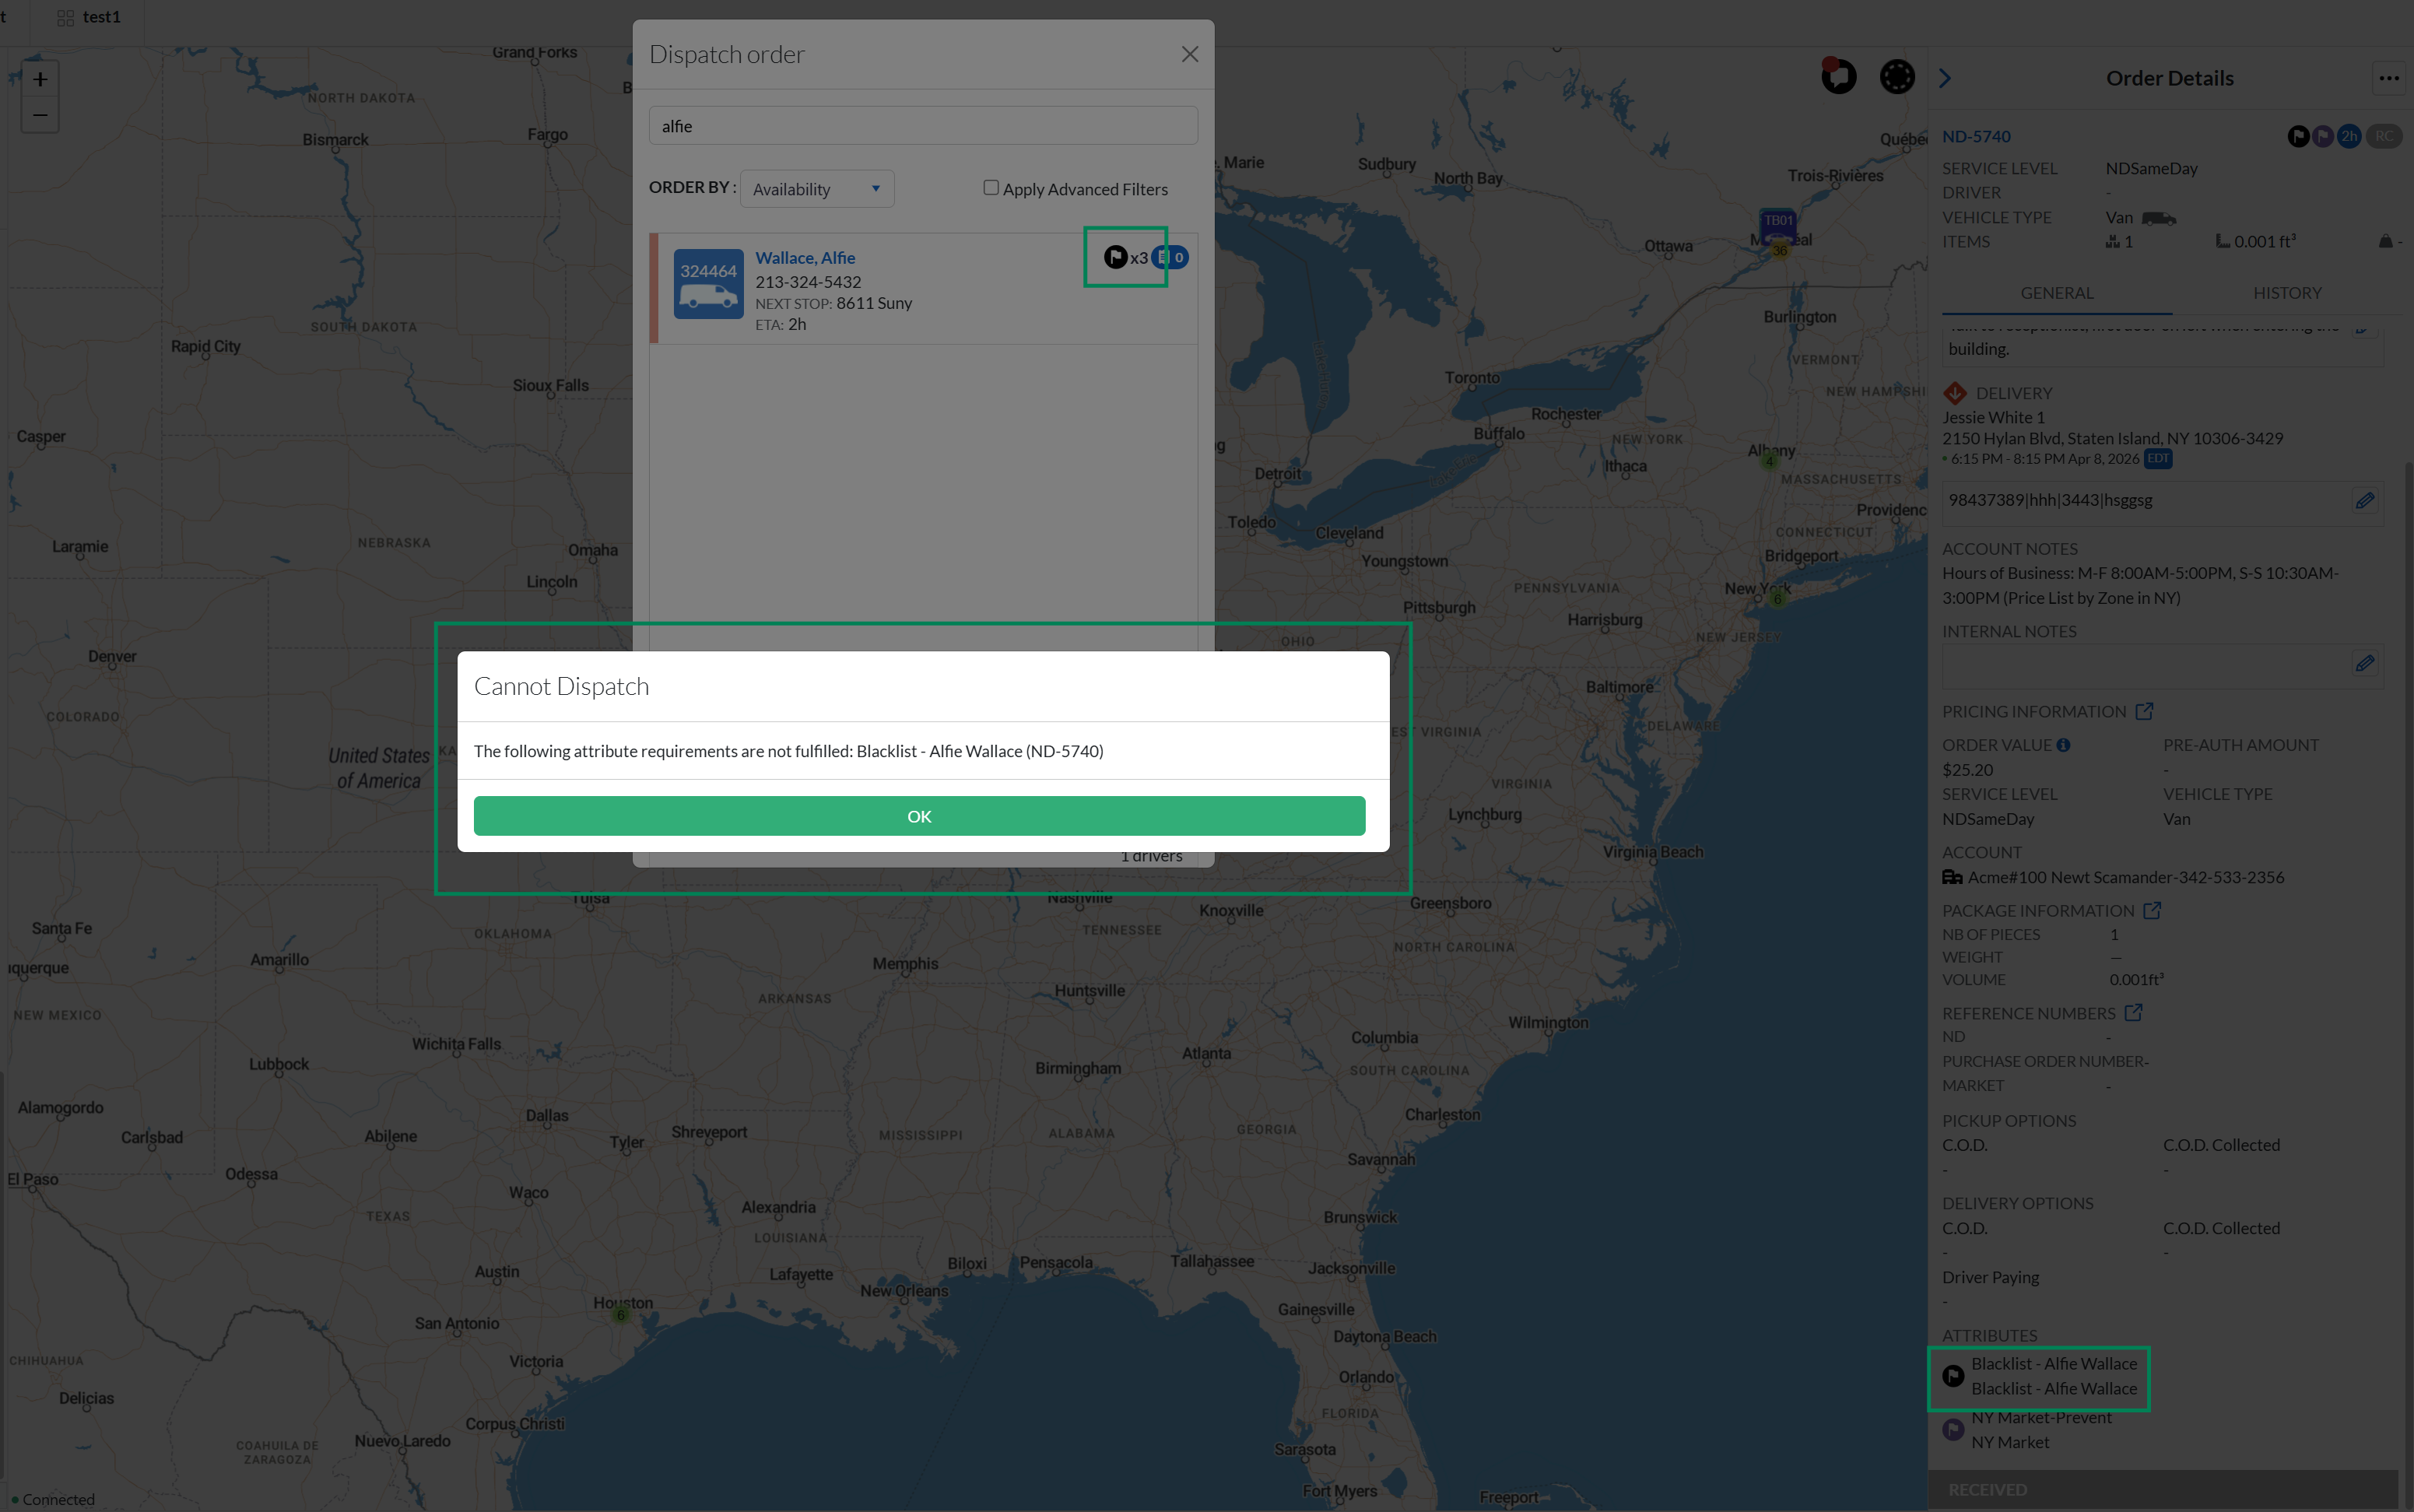
A new dispatch trigger has also been added: previously, warnings or dispatch prevention applied only when an order had an attribute, but the driver did not. With this new feature, the same warning or prevention can also be applied when the attribute exists on both the order and the driver, allowing users to enforce rules such as blacklisting specific drivers from certain orders.
This enhancement allows attributes to be applied selectively and validated across entities, giving dispatchers control to warn or block orders if the required attribute is missing or misaligned, improving operational reliability, order accuracy, and adherence to business rules.
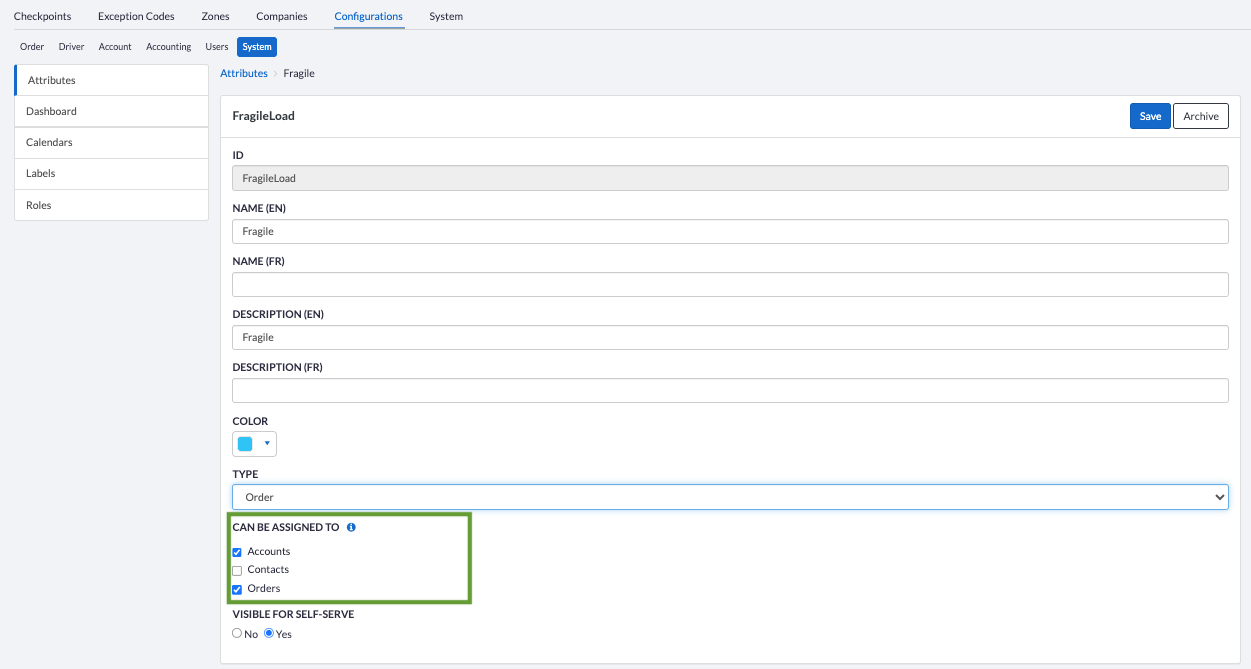
Attribute detail screen — new options
Go to Settings › Configurations › System › Attributes. For Order or Order & Driver type attributes:
Can be Assigned To — new checkboxes:
| Checkbox | Effect |
|---|---|
| Accounts | Selectable on account |
| Contacts | Selectable on account contact and account user contacts |
| Orders | Selectable directly on orders and order templates |
| Driver (read-only) | Always checked for Order & Driver type |
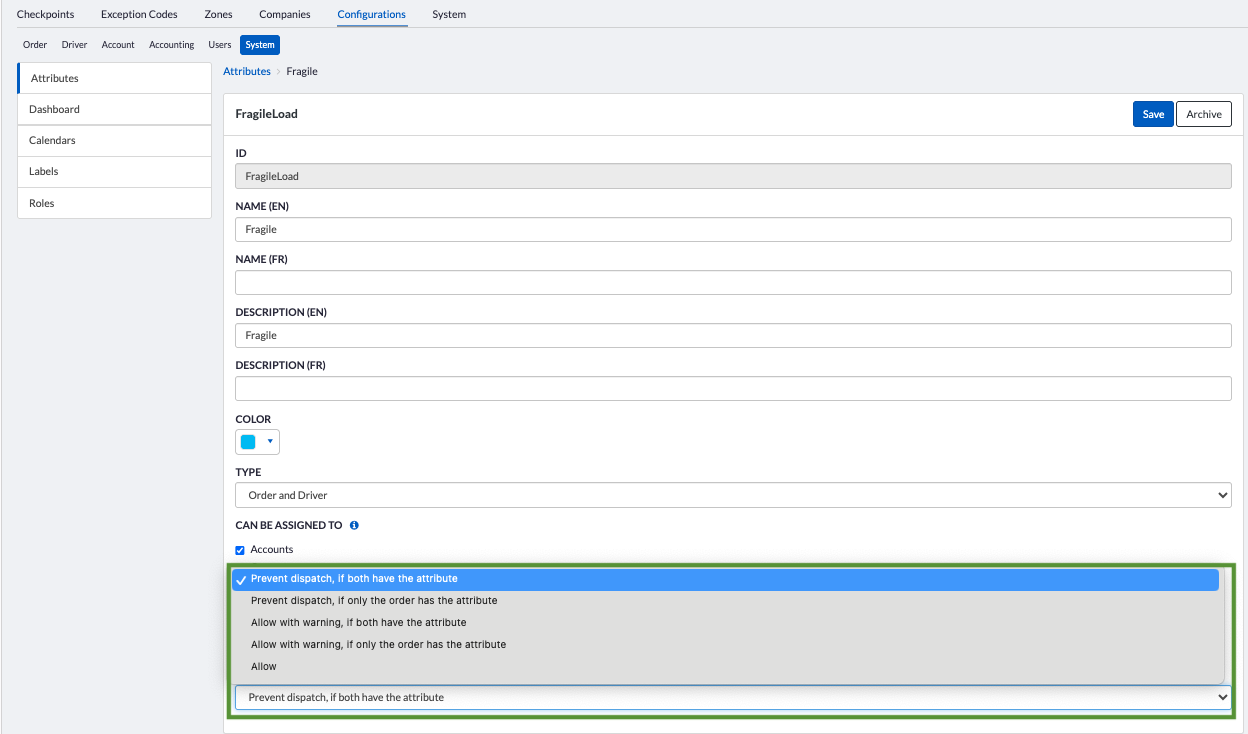
Dispatch option — two new values:
| Option | Triggers when… |
|---|---|
| Allow | No message displayed on dispatch (existing) |
| Prevent dispatch, if only order has the attribute | Driver does not have the attribute (existing) |
| Allow with warning, if only order has the attribute | Driver does not have the attribute (existing) |
| Prevent dispatch, if both have the attribute | Driver also has the attribute (new) |
| Allow with warning, if both have the attribute | Driver also has the attribute (new) |
Applying attributes to Account Contacts and Account User Contacts.
- Open an account, go to Contacts, and open a contact.
Attributes can also be added to account user contacts by going to Users in the account and clicking on the contact icon ( ) located to the right of the user. In the user contact list, open a contact.
 - Scroll to the Attributes section.
- Add the relevant attributes and date information and save.
Attribute inheritance on orders
- Attributes set on Accounts are automatically added to new orders and checked by default. Users can uncheck them; they remain listed unless the account or contact changes.
- When the account or contact changes on an order or template, attributes from the previous account/contact that are not on the new one are removed. Attributes added directly on the order are kept.
Dispatch prevention & warnings
All attribute rules are evaluated at dispatch time. Prevention blocks dispatch and lists all reasons. Warning shows a confirmation dialog box.
In the following example, the attribute "Blacklist - Alfie Wallace", set to "Prevent dispatch, if both have the attribute", was added on both the driver Alfie Wallace and on the pickup contact.
Scripts & Script Rules
Enhanced Metadata Access for Developer Toolkit
Scripted extra fees can read the metadata stored in their result via a new method in the script extra fee context, enabling more dynamic fee calculations.
A new method GetExistingMetadata() in the script extra fee context provides read access to the current extra fee's stored metadata as a key-value collection — same structure used when writing it.
This new method supports more complex, dynamic pricing logic while maintaining consistency and flexibility in fee computations.
Show code example — GetExistingMetadata()
    /// Example showing how to read metadata that was previously stored on the extra fee
    /// during an earlier calculation.
    ///
    /// Use case: a surcharge that is locked to its initially calculated price.
    /// When the fee is recalculated (e.g. on order update), the script reads back
    /// the original price from metadata and returns it instead of recalculating,
    /// preventing unexpected price changes after the first booking.

    public class UseExistingMetadataExtraFee : IExtraFeeScript
    {
        private const string MetadataKeyLockedUnitPrice = "lockedUnitPrice";
        private const string MetadataKeyCalculatedWeight = "calculatedWeightKg";

        public async Task<ExtraFeeScriptResult> GetExtraFeePriceInfo(OrderScriptInfo order, IScriptDataProvider data, ILogger logger)
        {
            var context = await data.GetContext();

            // Read metadata stored during a previous calculation of this extra fee.
            var existingMetadata = await context.ExtraFee!.GetExistingMetadata();

            if (existingMetadata is not null && existingMetadata.TryGetValue(MetadataKeyLockedUnitPrice, out var rawLockedPrice))
            {
                // The price was already calculated and locked on the first run — reuse it.
                var lockedPrice = Convert.ToDecimal(rawLockedPrice);
                logger.LogInformation("Returning locked unit price {Price} from previous calculation.", lockedPrice);

                return new ExtraFeeScriptResult
                {
                    Quantity = 1,
                    UnitPrice = lockedPrice,
                    Details = new ExtraFeeScriptResultDetails
                    {
                        TitlePrimary = "Weight Surcharge (locked)",
                        // Carry the metadata forward so it is preserved on subsequent recalculations.
                        Metadata = existingMetadata
                    }
                };
            }

            // First-time calculation: compute the price and store it in metadata.
            var totalWeightKg = order.OrderItemInfos.Sum(i => i.Weight ?? 0);
            const double includedWeightKg = 10.0;
            const decimal pricePerExtraKg = 0.50m;

            var billableWeight = Math.Max(0, totalWeightKg - includedWeightKg);
            var unitPrice = Convert.ToDecimal(billableWeight) * pricePerExtraKg;

            logger.LogInformation(
                "First calculation: total weight {Total} kg, billable {Billable} kg, unit price {Price}.",
                totalWeightKg, billableWeight, unitPrice);

            return new ExtraFeeScriptResult
            {
                Quantity = 1,
                UnitPrice = unitPrice,
                Details = new ExtraFeeScriptResultDetails
                {
                    TitlePrimary = "Weight Surcharge",
                    DescriptionPrimary = $"{billableWeight:F2} kg over {includedWeightKg} kg included",
                    Metadata = new Dictionary<string, object?>
                    {
                        [MetadataKeyLockedUnitPrice] = unitPrice,
                        [MetadataKeyCalculatedWeight] = totalWeightKg
                    }
                }
            };
        }
}Tenant API
Full Attributes, VehicleType, and ServiceLevel CRUD via Tenant API
New endpoints have been added for attributes, vehicle types and service levels. Using these new endpoints, businesses can maintain consistent data across systems, automate setup and updates, and improve operational efficiency.
Full Attributes CRUD Endpoints
Attributes can be created, edited, archived and unarchived programmatically via the Tenant API, including attributes already in use.
| Method | Endpoint | Action |
|---|---|---|
GET | /api/v1/attributes | Get all attributes |
POST | /api/v1/attributes | Create an attribute |
PUT | /api/v1/attributes/{attributeId} | Edit all information on an attribute |
PATCH | /api/v1/attributes/{attributeId} | Partially edit information on an attribute |
POST | /api/v1/attributes/{attributeId}/archive | Archive an attribute |
POST | /api/v1/attributes/{attributeId}/unarchive | Unarchive an attribute |
Create & Manage Vehicle Types
Vehicle types can be created and edited programmatically via the Tenant API, including vehicles already in use.
| Method | Endpoint | Action |
|---|---|---|
GET | /api/v1/vehicletypes | List all vehicle types |
| POST | /api/v1/vehicletypes | Create a new vehicle type |
GET | /api/v1/vehicletypes/{id} | Get vehicle by ID |
| PATCH | /api/v1/vehicletypes/{id} | Update an existing vehicle |
GET | /api/v1/vehicletypes/icons | List available vehicle icons |
Create & Manage Service Levels
Service levels can be created, edited, archived and unarchived programmatically via the Tenant API, including service levels already in use.
| Method | Endpoint | Action |
|---|---|---|
GET | /api/v1/serviceleveltypes | List all service levels |
| POST | /api/v1/serviceleveltypes | Create a new service level type |
GET | /api/v1/serviceleveltypes/{id} | Get a service level type by ID |
| PATCH | /api/v1/serviceleveltypes/{id} | Update an existing service level type |
POST | /api/v1/servicelevels/{id}/archive | Archive an existing service level type |
POST | /api/v1/servicelevels/{id}/unarchive | Unarchive an existing service level type |
Driver Pay Rate Fuel Surcharge Schedule on Accounts
Adding the Driver Pay Rate Fuel Surcharge Schedule on Accounts enables end-to-end automation of driver compensation logic by including the fuel surcharge schedule in account API endpoints. It ensures accurate and consistent application of fuel-related adjustments across integrated systems, reduces the risk of discrepancies, and supports scalable financial operations.
The Tenant API account endpoints now expose and accept the Driver Pay Rate Fuel Surcharge Schedule configuration (driverPayRateFuelSurchargeScheduleId).
GET /api/v1/accounts/{accountId}— now returnsdriverPayRateFuelSurchargeScheduleConfigurationId.POST /api/v1/accounts— acceptsdriverPayRateFuelSurchargeScheduleConfigurationId(optional).PATCH /api/v1/accounts/{accountId}— accepts the same field to update it.
Zone Data Added to Order Endpoints
Three existing order API endpoints now return zone information as part of the order response:
GET /api/v1/orders?ids=...(bulk fetch by IDs)GET /api/v1/orders/{orderId}(single order fetch)POST /api/v1/orders/quote(order quote)
When an order has zones assigned, the response now includes an embedded zones collection. Each entry contains:
| Field | Description |
|---|---|
ZoneId | The identifier of the zone |
StopKind | The stop the zone is associated with (Pickup, Dropoff, or Warehouse) |
ZoneTypes | Array of zone type flags (e.g. Address, AutoDispatch, DriverPosition, Filtering, Taxes, Script, Other) |
The zones collection is only present in the response when at least one zone is associated with the order.
Webhook Subscriptions for Late ETA Notifications
Two new webhook event types — OrderPickupLate and OrderDeliveryLate — will send notifications to subscribed URLs when an ETA update results in a projected stop time exceeding the defined time window at the time of the optimization. If an order becomes late after an optimization, the notification will be sent at the next optimization.
Each subscription can be set up with the following options. The subscription payload will only be sent if all three options are enabled. If no configuration section is added, the subscription payload is sent immediately when a late event occurs.
Decimal values are supported.
| Field | Description | Default Time |
|---|---|---|
hoursInAdvance | Send if ETA minus the Optimization time <= value | 2 hours |
gracePeriodInMinutes | Send if ETA minus Window To >= value | 5 minutes |
resendThresholdInMinutes | Only resend if ETA − previous ETA >= value | 15 minutes |
Order Status Endpoints – Idempotent Behavior Update
In prior versions, a 409 (Conflict) response was returned when attempting to apply a status change to an order that was already in the requested state, including:
- Calling
POST /api/v1/orders/{orderId}/pickupon an order already in Pickup status - Calling
POST /api/v1/orders/{orderId}/deliveron an order already in Delivered status - Calling
POST /api/v1/orders/{orderId}/cancelon an order already Cancelled - Calling
POST /api/v1/orders/{orderId}/unassignon an order not currently assigned to a driver
Because the order was already in the intended state, these responses generated avoidable conflicts. With this release, these endpoints now return 200 (OK) response when the requested status already matches the current order state. No updates will be applied to the order in these cases. If a change is needed, use the PATCH /api/v1/orders/{orderId} endpoint to update the specific fields.
Ad-Hoc Notification: Support for Additional Recipients
The POST /api/v1/notifications endpoint now accepts an optional AdditionalRecipients array, allowing callers to inject extra email recipients on a per-request basis alongside the template-defined ones.
{
  "NotificationTemplateId": 42,
  "Metadata": {
    "key": "value"
  },
  "AdditionalRecipients": [
    {
      "Name": "Jane Doe",
      "Email": "jane.doe@example.com"
    },
    {
      "Name": "John Smith",
      "Email": "john.smith@example.com"
    }
  ]
}| Field | Type | Required | Description |
|---|---|---|---|
AdditionalRecipients | Array | No | Optional list of extra recipients to include for this notification only. |
AdditionalRecipients[].Name | String | Yes (if entry present) | Display name of the recipient. |
AdditionalRecipients[].Email | String | Yes (if entry present) | Email address of the recipient. Must be a valid email address. |
Notes:
- Omitting the field or passing an empty array has no effect.
- Additional recipients are merged with template-level and module-level recipients; duplicates are removed.
- Notifications with different additional recipient sets are kept in separate batches.
Full Script Rules CRUD via Tenant API
New endpoints have been added to the Tenant API to manage Script Rules programmatically. Integrators can create, update, activate, deactivate, and delete Script Rules, as well as upload the Excel files associated with them.
| Method | Endpoint | Action |
|---|---|---|
GET | /api/v1/script-rules | Get all Script Rules |
GET | /api/v1/script-rules/{id} | Get a Script Rule by ID |
POST | /api/v1/script-rules | Create a new Script Rule |
PUT | /api/v1/script-rules/{id} | Update a Script Rule |
DELETE | /api/v1/script-rules/{id} | Delete a Script Rule |
POST | /api/v1/script-rules/{id}/activate | Activate a Script Rule |
POST | /api/v1/script-rules/{id}/deactivate | Deactivate a Script Rule |
POST | /api/v1/script-rules/{id}/file | Process an uploaded file and associate it with the rule |
GET | /api/v1/script-rules/{id}/file | Download the file associated with a rule |
DELETE | /api/v1/script-rules/{id}/file | Delete the file associated with a rule |
GET | /api/v1/script-rules/{id}/file/exists | Check whether a file exists for the rule |
OrderUpdate. Referencing a script of another type will return a validation error.OData
OrderProfileId in Order Templates Table
Field OrderProfileId is now available in the OData OrderTemplates table. This field along with the AccountProfiles, Workflows, WorkflowSteps and SelectionSteps table will provide the workflow information associated to an order template.
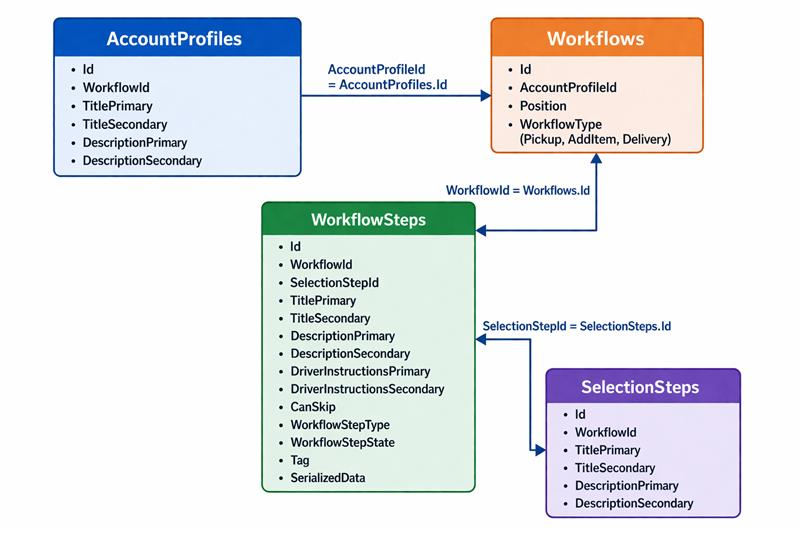
Support for Account Workflows
Four new tables are now available in OData to support account workflows:AccountProfiles, Workflows, WorkflowSteps, and SelectionSteps.
These tables are linked together to define configurable workflows and their steps for each account profile.
AccountProfilesdefine the starting pointWorkflowsorganize processes per profileWorkflowStepsdefine execution logicSelectionStepsoptionally group steps together
Table Descriptions
AccountProfiles
Represents the entry point and configuration for workflows.
Id– Primary identifierWorkflowId– Reference to a workflowTitlePrimary/TitleSecondaryDescriptionPrimary/DescriptionSecondary
Workflows
Defines the workflows associated with an account profile.
Id– ID of the WorkflowAccountProfileId– Links toAccountProfiles.IdPosition– Order of executionWorkflowType– (Pickup,AddItem,Delivery)
WorkflowSteps
Contains the individual steps within a workflow.
Id– ID of the WorkflowStepWorkflowId– Links toWorkflows.IdSelectionStepId– Links toSelectionSteps.Id(if grouped)TitlePrimary/TitleSecondaryDescriptionPrimary/DescriptionSecondaryDriverInstructionsPrimary/DriverInstructionsSecondaryCanSkipWorkflowStepType/WorkflowStepStateTagSerializedData
SelectionSteps
Defines grouped steps within a workflow (optional grouping layer).
Id– ID of the SelectionStepWorkflowId– Links toWorkflows.IdTitlePrimary/TitleSecondaryDescriptionPrimary/DescriptionSecondary
Was this article helpful?
That’s Great!
Thank you for your feedback
Sorry! We couldn't be helpful
Thank you for your feedback
Feedback sent
We appreciate your effort and will try to fix the article