A price list defines how Dispatch Science prices an order. Each price list is one of three types — by distance, by zone, or combined — and the type sets how the delivery price is calculated. Once a price list is attached to an account, every order for that account is priced automatically from it.
Table of Contents
- What a Price List Is
- Price by Distance
- Price by Zone
- Combined Price Lists
- Failover Price Lists
- Which Price List Type Should I Use?
- Assigning a Price List to an Account
- Warehouse vs Account Travelling Distance
- Choosing a Pricing Method
What a Price List Is
A price list has a Name and a Type. The Type is one of By Distance, By Zone, or Combined, and it is chosen when the list is created; afterwards it is shown as read-only. The type decides how the delivery price is calculated:
- By Distance — the price depends on how far the order travels.
- By Zone — the price depends on the pickup and delivery areas (zones).
- Combined — the price is the sum of two other price lists.
All price lists appear on the Price List page, which shows each list's Name and Type. All three types are configured from the same editing screen; only the fields that apply to the selected type are shown.
The sections below explain how each type calculates a price and when to use it. The worked examples follow three real price lists on the demo environment: Price List by Distance (By Distance), Price by Zone NY (By Zone), and CTStart (Combined).
Price by Distance
A By Distance price list sets the price from how far the order travels. Use it when the delivery price should grow with distance — a base charge plus a per-unit rate, with longer trips costing more.
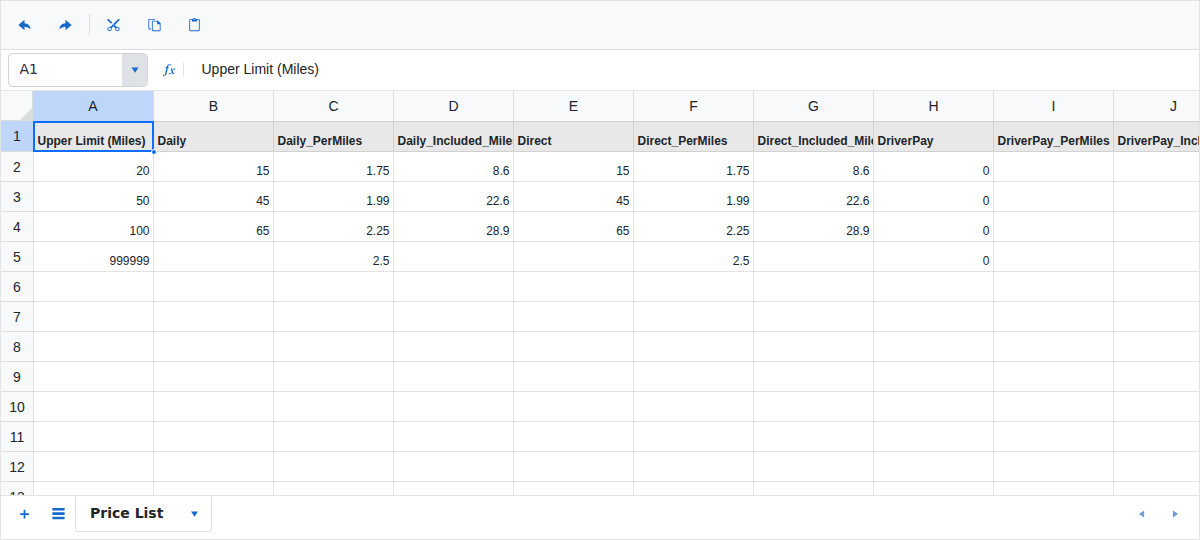
A By Distance list holds one or more distance bands for each service level. Each band has an upper distance limit, an optional flat fee, an optional per-unit rate, and an included distance. The example below follows the Price List by Distance list, whose distance unit is miles.
Worked Example
Take an order on the Regular service level, carried by a Car, travelling 15 miles.
Step 1 — Select the distance band. Dispatch Science picks the band whose upper limit is the smallest value at or above the order distance. The Regular bands run to 20, 50, 100, and 999,999 miles, so a 15-mile order falls in the first band (up to 20 miles):
| Value (Regular, up to 20 mi) | Amount |
|---|---|
| Flat fee | $15.00 |
| Per-mile rate | $1.75 |
| Included distance | 8.6 mi |
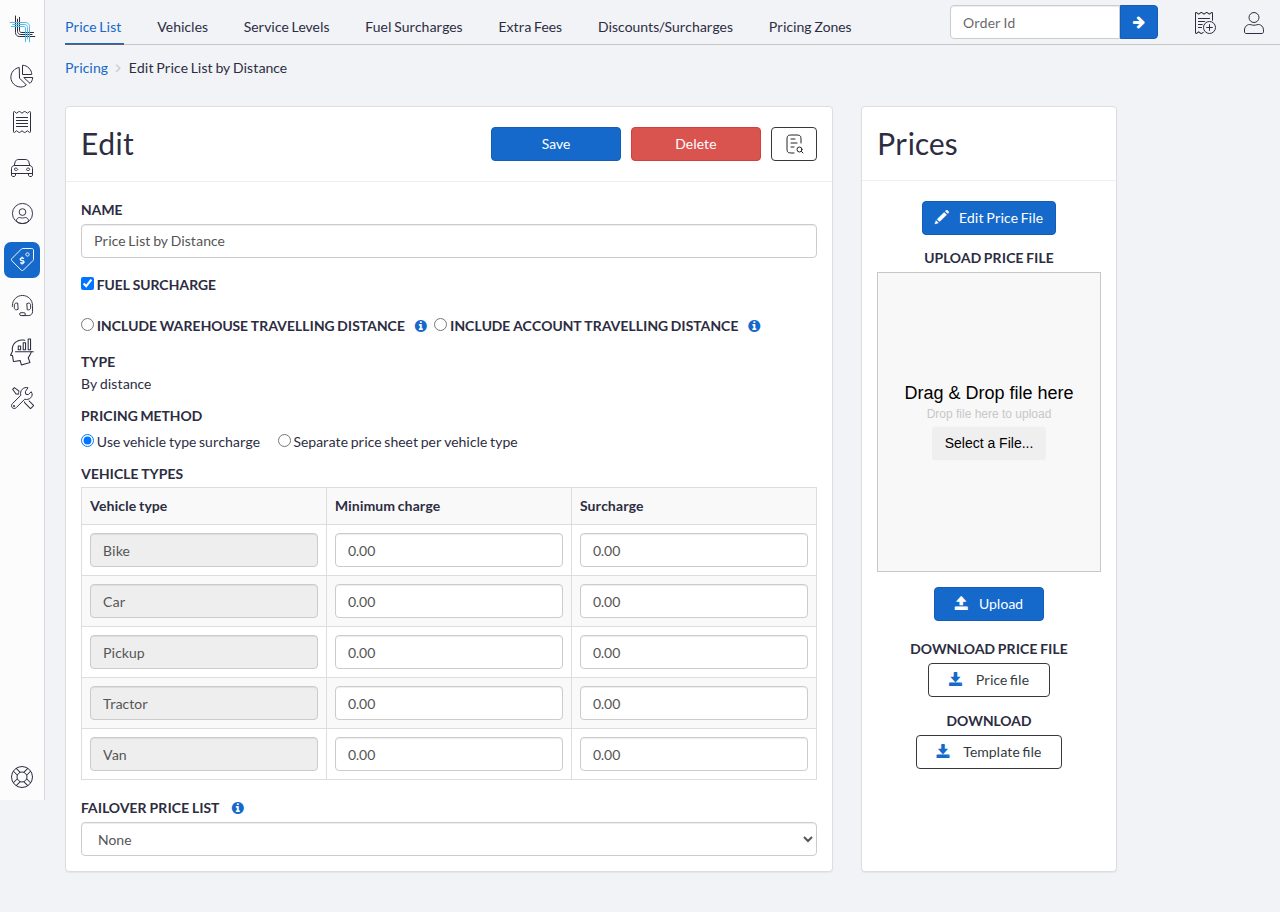
The vehicle-type table sets a Minimum charge and a Surcharge per vehicle; on this list both are $0.00 for every vehicle type.
Step 2 — Billed distance. Billed distance = order distance − included distance, never below 0 — here 15 − 8.6 = 6.4 miles.
Step 3 — Base charge. Base = flat fee + (per-mile rate × billed distance), rounded to two decimals — here 15.00 + (1.75 × 6.4) = 15.00 + 11.20 = $26.20.
Step 4 — Minimum charge. The service-level price is the greater of the base charge and the vehicle-type minimum charge. The minimum is $0.00, so the price stays $26.20.
Step 5 — Vehicle surcharge. The vehicle-type surcharge is added. It is $0.00 here, so the price before fuel is $26.20.
Step 6 — Fuel surcharge. This list has Fuel Surcharge enabled, so a fuel surcharge is added on top of the $26.20. It is charged either as a percentage of the price before fuel or as an amount per distance unit multiplied by the order distance, using the tenant's Fuel Surcharge schedule (configured outside the price list).
Price by Zone
A By Zone price list sets the price from the pickup and delivery areas rather than the exact distance travelled. Use it when you charge a fixed price between areas — for example, a set price for any delivery from one city zone to another. To use zones in a price list, a Zone Layout must first exist; building a zone layout is covered separately in the Pricing Zones guide.
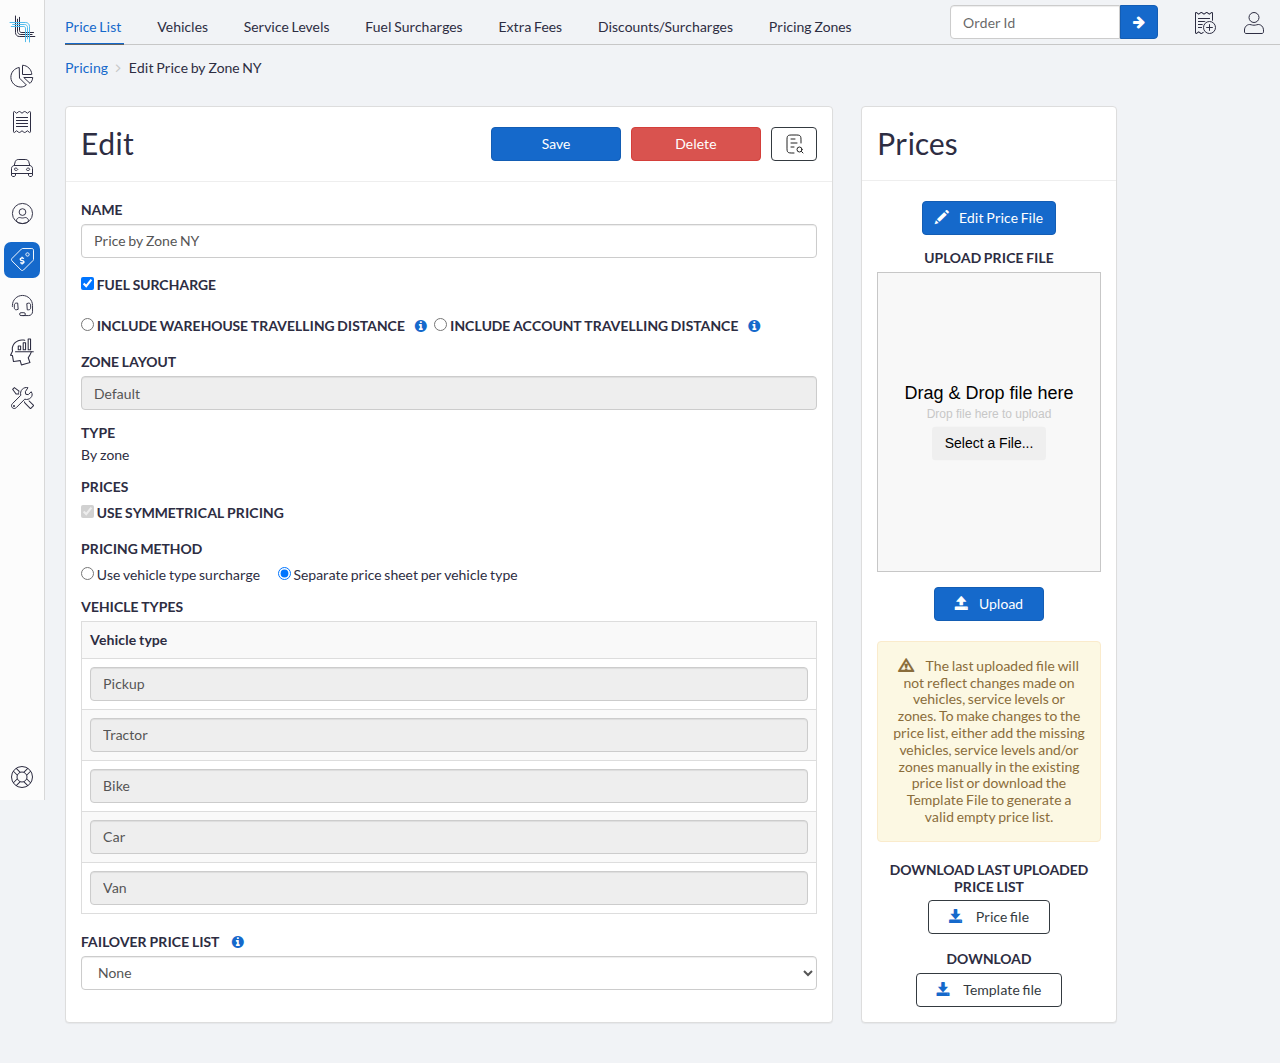
The example below follows the Price by Zone NY list. Its zones are BostonZone, NewYorkZone, and NSTorontoZone, and it uses a separate price sheet per vehicle type (a distinct sheet for Bike, Car, and Van).
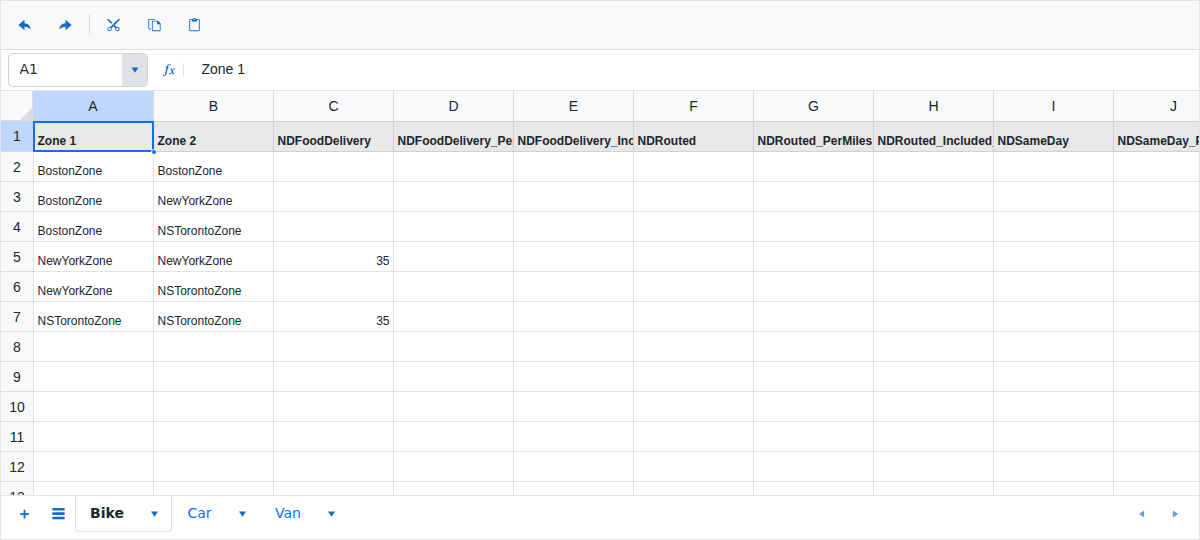
If the included zones in the price list's zone layout are updated, the price sheet will not be automatically updated. The user must download the template file and re-upload it.
Worked Example
Take an order on the NDSameDay service level, carried by a Car, picked up in BostonZone and delivered in NewYorkZone.
Step 1 — Resolve the zones. Dispatch Science resolves the pickup and delivery locations to a pickup zone and a delivery zone (by map polygon or by postal code, depending on the zone layout). Here that gives BostonZone → NewYorkZone.
Step 2 — Look up the zone-pair price. On the Car sheet, the NDSameDay price for the BostonZone → NewYorkZone pair is $115.00. For reference, the other Car NDSameDay prices are:
| From → To (Car, NDSameDay) | Price |
|---|---|
| BostonZone → BostonZone | $15.00 |
| BostonZone → NewYorkZone | $115.00 |
| BostonZone → NSTorontoZone | $300.00 |
| NewYorkZone → NSTorontoZone | $450.00 |
Step 3 — Base charge. The zone-pair price becomes the base charge the same way as for a By Distance list: base = flat fee + (per-unit rate × billed distance), rounded to two decimals. This pair is a flat zone fee with no per-mile rate, so the base is simply $115.00.
Step 4 — No vehicle minimum charge or surcharge. Because this list uses Separate price sheet per vehicle type, the per-vehicle Minimum charge and Surcharge are not applied (each vehicle already has its own sheet). The price before fuel is $115.00. (Had the list used Use vehicle type surcharge, the minimum charge and surcharge would apply here, exactly as in the By Distance example.)
Step 5 — Fuel surcharge. This list has Fuel Surcharge enabled, so a fuel surcharge is added on top of the $115.00.
When to Use Symmetric Zone Pricing
The Use symmetrical pricing checkbox controls whether a zone-pair price applies in one direction or both. It is shown only for By Zone lists.
- Checked — a price defined for a pair (A → B) is also used for the reverse direction (B → A). You set each pair once. Use symmetric pricing when both directions cost the same.
- Cleared — only the exact from-zone/to-zone direction matches, so each direction must be priced separately. Clear it when a direction costs more than its reverse — for example, when deliveries out of a busy zone are priced higher than deliveries into it.
The Price by Zone NY list has Use symmetrical pricing turned on. That is why its sheet lists the BostonZone → NewYorkZone pair once at $115.00: the same $115.00 automatically applies to NewYorkZone → BostonZone, with no second row to fill in.

Combined Price Lists
A Combined price list adds two other price lists together. Use it when an order needs two charges at once — for example, a zone charge plus a separate distance charge.
The example below follows the CTStart list. It names two inner lists: Price List #1 is CT-Zone1 (a By Zone list) and Price List #2 is CT-Distance 1 (a By Distance list).
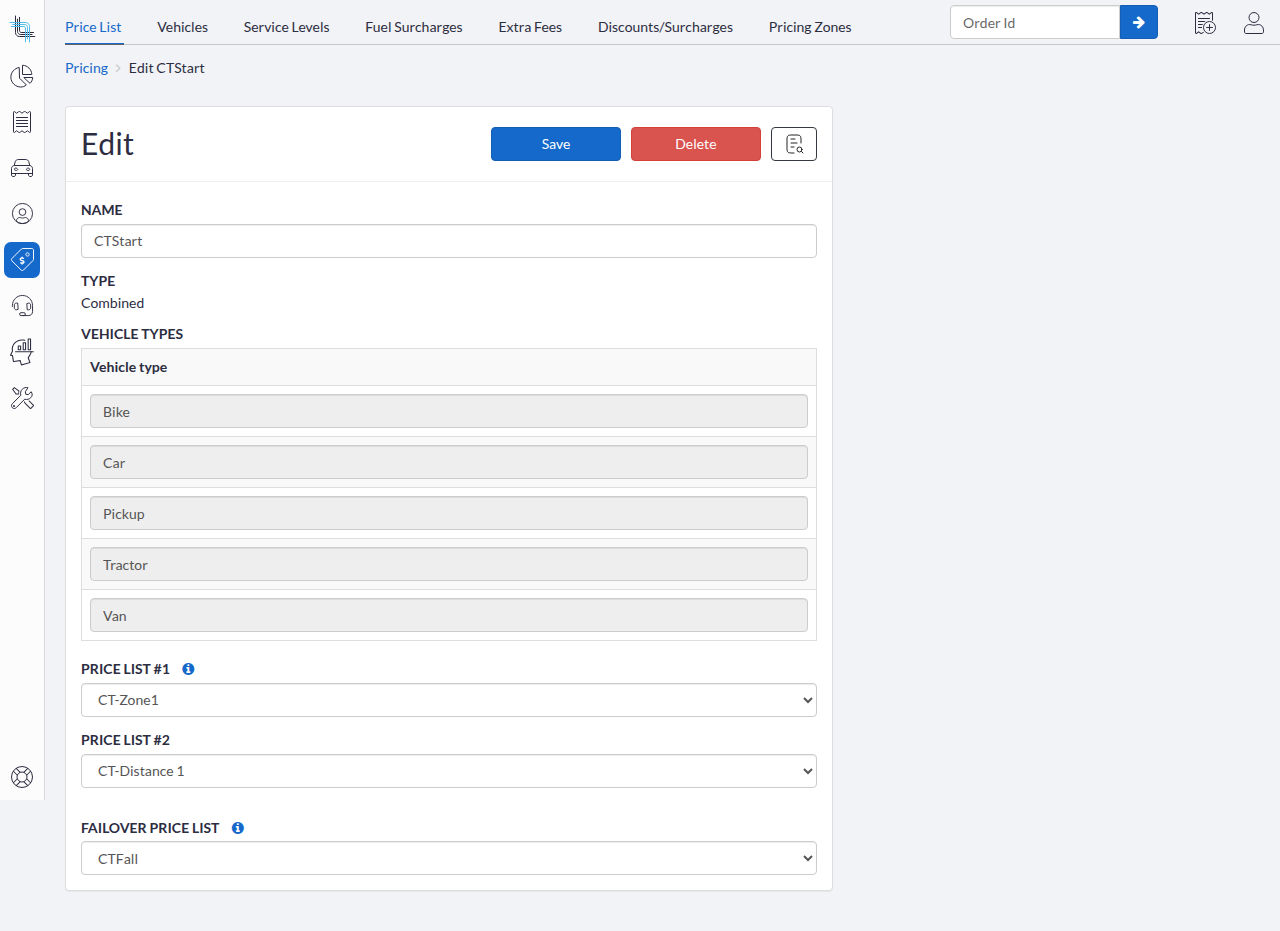
Worked Example
Take a Car order on the Direct service level, picked up and delivered inside the Local zone, travelling 8 miles.
Step 1 — Price with Price List #1 (CT-Zone1). Using that list's own zone rules, the Direct price for the Local → Local pair (Car sheet) is $50.00 before fuel. If the price list included a travelling distance, the price would be calculated using the distance formula indicated in its distance formula.
Step 2 — Price with Price List #2 (CT-Distance 1). This list recomputes its own distance independently. An 8-mile order selects that list's first band (up to 10 miles), whose Direct price is a flat $225.00 before fuel. If the price list included a travelling distance, the price would be calculated using the distance formula indicated in its distance formula.
Step 3 — Add the two pre-fuel totals. 50.00 + 225.00 = $275.00 before fuel.
Step 4 — Distance. The distance reported for the order comes from Price List #1, however, as indicated above, the price from each price list will use its own distance formula.
Step 4 — Fuel surcharge. The fuel-surcharge behaviour also comes from Price List #1 — a combined list has no Fuel Surcharge setting of its own and therefore takes its fuel surcharge option from Price List #1 .
A combined list cannot carry travelling-distance options or a fuel-surcharge flag of its own; its inner lists carry them. When an order price is overridden manually, only Price List #1 is applied, so the manual price is not doubled.
Failover Price Lists
A Failover Price List is a backup price list that Dispatch Science uses when the main price list cannot produce a price for an order. It lets an account keep pricing orders the main list does not cover — for example, a destination outside the list's zones or a distance beyond its bands. You set it in the Failover Price List dropdown on the price list's editing screen; it is available for all three types.
When a By Distance or By Zone List Fails Over
A By Distance or By Zone list falls back to its failover when it cannot price the order. This happens when:
- By Distance — no distance band covers the order distance for the requested service level, the order's vehicle type is not available, or a matching band has neither a flat fee nor a per-unit rate (so it yields no base charge).
- By Zone — the pickup or delivery location maps to no zone, the order's vehicle type is not available, the zone pair is not priced, or a matching row yields no base charge.
The failover list then prices the order in place of the main list. A failover list can itself name a failover, so failovers chain: Dispatch Science follows the chain until one list prices the order or the chain ends. If no list in the chain can price the order, there is no price for that service level and an invalid price is returned.
How Failover Works for a Combined List
A combined list resolves failover in a specific order:
- Each inner list (Price List #1 and Price List #2) uses its own failover first, inside its own pricing.
- The combined list's own failover fires only when, after both inner lists have tried (their own failovers included), at least one still produced no price.
- When the combined failover fires, it replaces the entire combined result — the inner prices are discarded, not added to it.
- If the combined list has no failover, or its failover also produces no price, the combined list produces no price and an invalid price is returned.
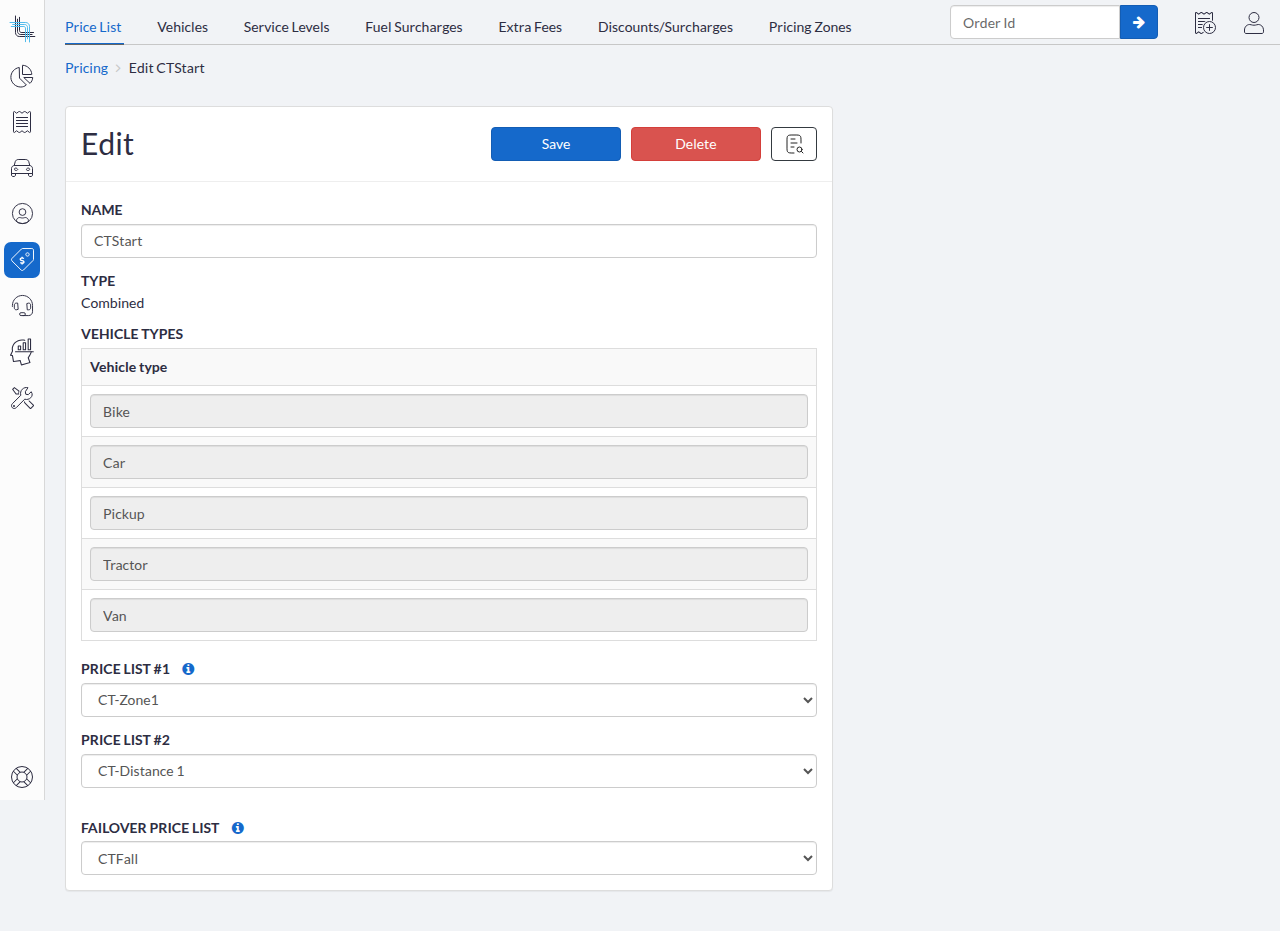
On the image below, CTStart list has two inner lists — CT-Zone1 and CT-Distance 1 — each have no failover of their own, and CTStart's Failover Price List is CTFall. So if either CT-Zone1 or CT-Distance 1 cannot price the order, CTFall prices the whole order in their place. CTFall is itself a price list that can carry its own failover, so the chain continues from there; if nothing in the chain resolves, the order gets no price.
Fuel Surcharge and Travelling Distance Under Failover
Whichever list actually prices (the account's price list or one of its failover) the order also governs these two behaviours:
- Fuel surcharge — the Fuel Surcharge toggle of the list that produces the price decides whether fuel is charged on the delivery price. The fuel-surcharge schedule (its rates) is shared at the account level, so only each list's on/off toggle differs. For a combined list, fuel comes from Price List #1 by default; when the combined failover fires instead, the failover list's Fuel Surcharge toggle governs if failover is a distance or zone price list. If the failover list is a combined price list, its Price List #1 's fuel surcharge toggle governs.
- Travelling distance — the pricing list's own Travelling Distance Options apply. A failover list recomputes the travelling distance itself under its own options; it does not carry over the main list's distance. In a combined list, the distance reported on the order is Price List #1's however, each price list will use its own travelling distance to calculate its price.
Which Price List Type Should I Use?
| Choose | When | How the price is set |
|---|---|---|
| By Distance | The price should depend on how far the order travels | A distance band is selected by its upper limit; base = flat fee + rate × billed distance |
| By Zone | The price should depend on the pickup and delivery areas, not the exact distance | A price is looked up for each origin/destination zone pair |
| Combined | Two charges are needed at once (for example, a zone charge plus a distance charge) | The pre-fuel totals of two inner lists are added together |
Which Price List Type Should I Use?
| Choose | When | How the price is set |
|---|---|---|
| By Distance | The price should depend on how far the order travels | A distance band is selected by its upper limit; base = flat fee + rate × billed distance |
| By Zone | The price should depend on the pickup and delivery areas, not the exact distance | A price is looked up for each origin/destination zone pair |
| Combined | Two charges are needed at once (for example, a zone charge plus a distance charge) | The pre-fuel totals of two inner lists are added together |
Assigning a Price List to an Account
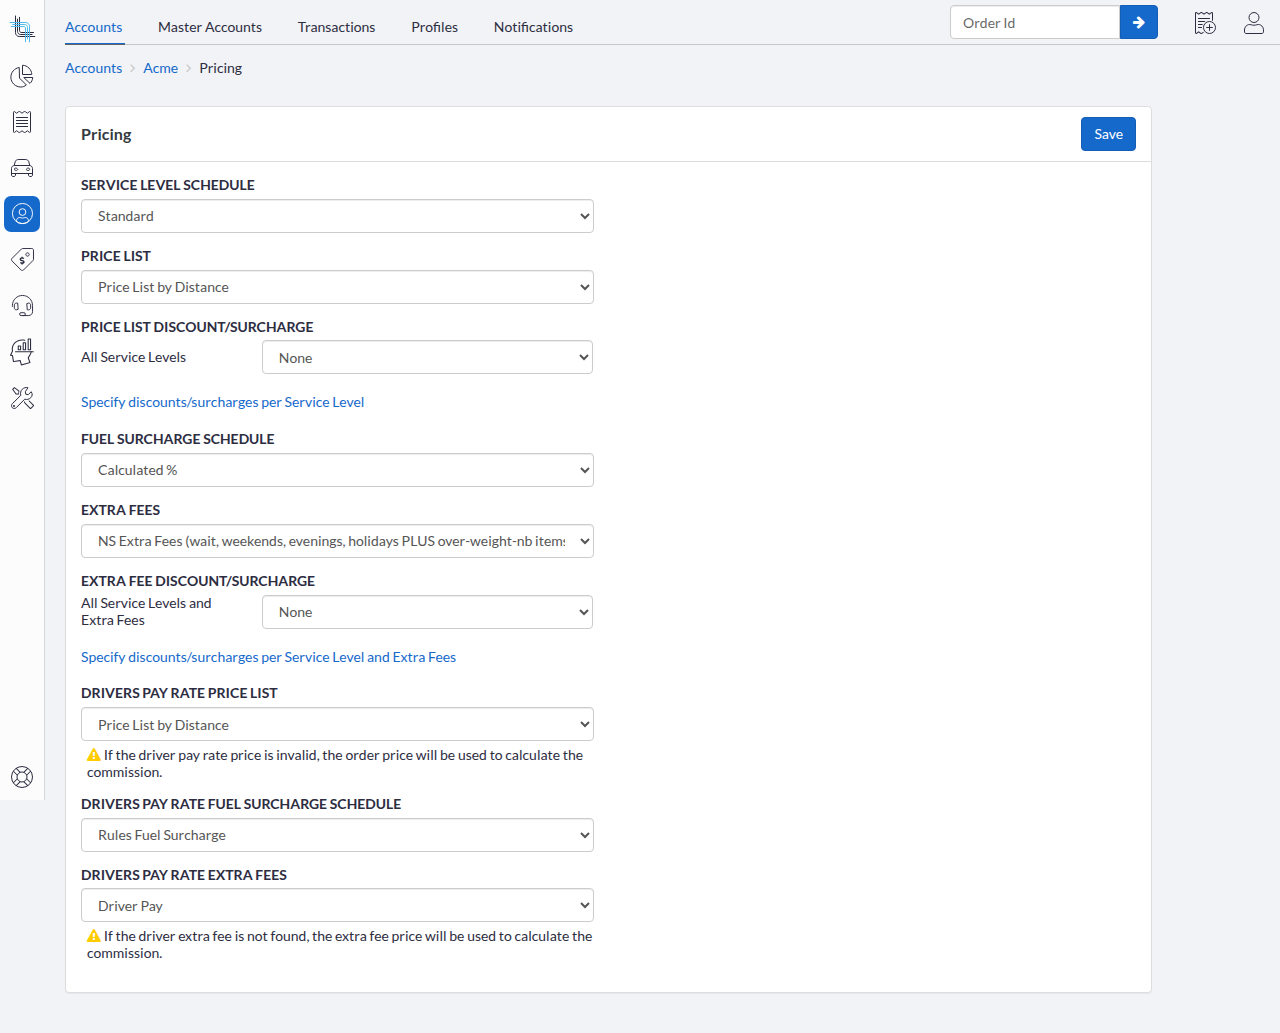
A price list only takes effect once it is attached to an account. The account's order price list drives what the customer is charged; an optional driver pay-rate price list drives what each driver is paid for that account's orders.
- Open the account and go to its Pricing page.
- Select the order price list in the Price List dropdown.
- Optionally, select a Drivers Pay Rate Price List.
- Click Save.
Warehouse vs Account Travelling Distance
For By Distance and By Zone lists, you can add travelling (deadhead) distance to the order's pickup-to-delivery distance before the price is calculated. This accounts for the legs a driver travels to reach the pickup and to return after the delivery. The choice is made in the Travelling Distance Options panel and does not apply to combined lists.
Two options are offered, and only one can be active:
- Include Warehouse Travelling Distance — measures the round trip from the price list's own warehouse coordinates (Latitude and Longitude). Use it when travelling distance is always measured from one fixed depot — the price is the same whichever account placed the order.
- Include Account Travelling Distance — measures the round trip from the ordering account's main address. Use it when travelling distance should be measured from each customer's own location. If the account has no main address, the travelling-distance formula is ignored and the price is calculated from the pickup-to-delivery distance alone.
Within the panel you can also exclude travelling distance for return orders (Exclude Distance On Return Orders) and for continuation orders (Exclude Distance On Continuation Orders). On both example lists (Price List by Distance and Price by Zone NY), neither travelling-distance option is enabled.

Choosing a Pricing Method
For By Distance and By Zone lists, the Pricing method sets how vehicle types affect the price. It does not apply to combined lists.
- Use vehicle type surcharge — one shared price sheet serves all vehicle types, and each vehicle type adds its own Minimum charge and Surcharge. The order's vehicle-type minimum charge sets a price floor, and its surcharge is added on top. Choose this when vehicle types differ by a simple add-on over a common rate. The Price List by Distance list uses this method: it has a single price sheet plus the Vehicle type / Minimum charge / Surcharge table.
- Separate price sheet per vehicle type — each vehicle type has its own price sheet, and no separate vehicle minimum charge or surcharge is applied. Choose this when each vehicle type needs fully different rates. The Price by Zone NY list uses this method: it has a distinct Bike, Car, and Van sheet.

Was this article helpful?
That’s Great!
Thank you for your feedback
Sorry! We couldn't be helpful
Thank you for your feedback
Feedback sent
We appreciate your effort and will try to fix the article