Saved views keep the way you have set up your Order List, so you can come back to that exact setup whenever you need it. Instead of rebuilding the same columns and filters every morning, you pick a saved view from the Views menu on the toolbar. Your saved views are personal: nobody else sees them, and they cannot be shared with a colleague.
Table of Contents
- What a Saved View Remembers
- Find and Switch Between Your Saved Views
- Create a New Saved View
- Update a Saved View
- Turn Auto-Save On or Off for a Saved View
- The Default View
- Delete a Saved View
- What You See When You Return
- Don't See the Views Button?
What a Saved View Remembers
A saved view captures four things:
- The columns: which ones are shown, which ones are hidden, how wide they are, and where they sit in the list.
- The sort: the column the list is sorted on, and in which direction.
- The column filters applied to the list.
- The page size: how many orders are listed per page (20, 50, 100 or 200).
Three choices are never part of a saved view:
- What you typed in the Search by box.
- The date range you picked (for example Past 2 weeks or Any time).
- The page of the list you are on.
A saved view also keeps working when the Order List gains or loses columns: a column the view does not mention keeps its standard placement, and a column the Order List no longer offers is ignored.
Find and Switch Between Your Saved Views
The Views button sits at the start of the Order List toolbar, just before the search box. It carries a bookmark icon and shows the name of the view currently applied, or the label Views when no view is applied:

Switch to another saved view:
- Open the Order List from the Orders menu.
- Click the Views button:
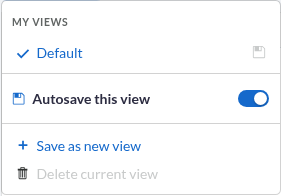
- Under MY VIEWS, click the name of the view you want.
The menu closes and the list is rebuilt from that view: its columns with their widths and positions, its sort, its column filters and its page size. The list returns to the first page, and the button now shows the name of the view you picked.
In the menu:
- Default is listed first, then your other views by name, regardless of upper or lower case.
- A check mark marks the view currently applied.
- A save icon at the right of a row means that view saves your changes on its own.
The Unsaved-Changes Dot
When you change something a saved view remembers, a dot appears next to the view's name on the Views button, with the tooltip "Unsaved changes". It means the list on screen no longer matches what the view has stored:

The dot disappears as soon as you save the view or switch to another one. A view that saves your changes on its own never shows the dot, because nothing is left unsaved. See Turn Auto-Save On or Off for a Saved View.
Create a New Saved View
Creating a saved view stores the setup currently on screen under a name of your choice. The view you were using is left with the setup it had saved.
- Set the Order List up the way you want it: show or hide columns, move and resize them, choose your sort, your filters and your page size.
- Click the Views button, then click Save as new view:
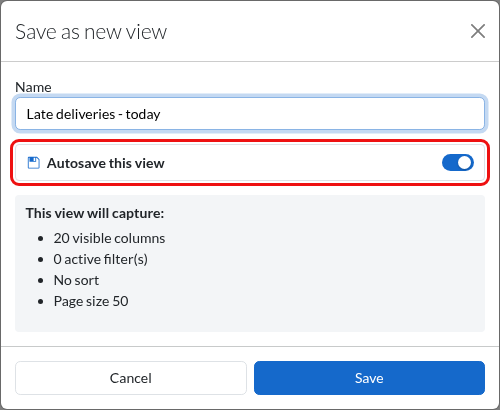
- Enter a Name. The name is required, can be up to 100 characters, and must differ from the names of your other views.
- Leave Autosave this view on, or switch it off. See Turn Auto-Save On or Off for a Saved View for what each choice changes.
- Check the This view will capture: summary, which lists the number of visible columns, the number of active filters, the sort (or No sort) and the page size:
- Click Save.
The new view becomes the applied view straight away and appears under MY VIEWS, after Default, in its alphabetical position. The list on screen is left as it is, and any unsaved-changes dot disappears because the new view already matches the list.
A view's name cannot be changed afterwards. To use a different name, create a new view with that name and delete the one you no longer need.
Update a Saved View
Save current view writes the setup currently on screen into the view you are using. It is offered only while that view does not save your changes on its own (see Turn Auto-Save On or Off for a Saved View).
- Change the Order List while your view is applied: show or hide a column, move or resize one, or change the sort, a filter or the page size. A dot appears on the Views button.
- Click the Views button.
- Click Save current view:
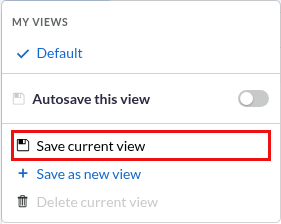
The view now stores what is on screen, and the dot disappears.
When the list already matches what the view has stored, Save current view is unavailable and its row shows a small "no changes" note. If a save does not go through, the view keeps the setup it last saved, so nothing already saved is lost.
Turn Auto-Save On or Off for a Saved View
Auto-save keeps a saved view up to date on its own: your changes to the columns, the sort, the filters and the page size are written into the view without anything to click. Auto-save is a property of a view, not of your user account, so you can keep one view that updates itself and another that only changes when you save it on purpose. New views start with Autosave this view on, and so does the Default view.
- Click the Views button while the view you want to change is applied.
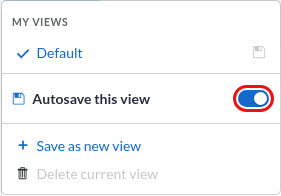
- Click the Autosave this view switch in the band under the view list.
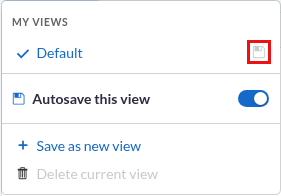
Turning auto-save on also saves the setup currently on screen into the view straight away, so an unsaved change on that view is kept and the unsaved-changes dot disappears. From then on your changes are written on their own, shortly after you stop adjusting the list, with no confirmation message and no dot. Save current view is no longer offered for that view, while Save as new view and Delete current view are unaffected:
Turning auto-save off changes only the setting. The view keeps the setup it last saved, nothing is rolled back and nothing is saved. Save current view comes back in the menu, and the dot appears again whenever the list differs from what the view has stored:
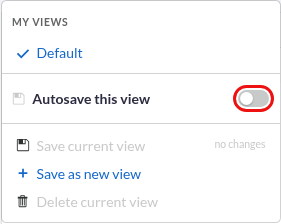
You can also make this choice when you create a view, in the Save as new view dialog. In MY VIEWS, a save icon at the right of a row tells you which of your views save on their own; its tooltip reads "Autosave on":
If an automatic save does not go through, the view keeps the setup it last saved.
When Saving Is Unavailable
Saving is suspended for the whole Order List while its search engine is working in a degraded mode. A warning next to the search box says so, and the date range options are unavailable at the same time. While saving is suspended:
- The Autosave this view switch is greyed out, with the tooltip "Autosave is unavailable right now", and automatic saves are paused.
- Save current view and Save as new view are greyed out, with the tooltip "Feature currently unavailable".
- You can still open the menu, read MY VIEWS, switch views and delete the applied view, and every saved view keeps the setup it stored.
The Default View
The first time you open the Order List with saved views available, a view named Default is created for you. It starts from the standard Order List column layout, with no sort, no filter, 50 orders per page, and Autosave this view already on.
Default cannot be deleted: while it is the applied view, Delete current view is unavailable and its tooltip reads "The default view cannot be deleted". Everything else works as with any other view. You can switch away from it and back to it, save your changes into it, turn its auto-save off, and use it as the starting point for Save as new view.
A view you create yourself never becomes the Default view: the Default view created for you stays the view the list falls back to.
Delete a Saved View
- Switch to the view you want to remove, so that it is the applied view. The action always targets the applied view.
- Click the Views button.
- Click Delete current view.
- Read the confirmation, then click Delete.
The deletion is permanent. The view disappears from MY VIEWS, the Default view is applied to the list, and the list returns to its first page. Closing the confirmation with Cancel leaves the view and the list untouched.
The Default view itself cannot be deleted. See What You See When You Return if the view was already removed in another session.
What You See When You Return
The Order List reopens on the view you last applied, with its columns, sort, filters and page size, in a new session and from any browser or device you sign in from. On your very first visit, that view is Default. If no view is marked as the last one you used, Default is applied, and failing that the first view in the list.
Working in More Than One Tab
Your saved views stay in sync across the tabs of the same browser. When you create a view, save one, change its auto-save setting or delete it in one tab, the MY VIEWS list in your other open tabs updates on its own.
- Another tab rebuilds its list only when it is showing the very view whose stored setup changed, and has no unsaved changes of its own.
- Switching views in one tab does not switch your other tabs.
- A tab whose applied view was deleted elsewhere falls back to the Default view.
- If a view was removed in another session and you then act on it, that tab stops showing the Order List; reopen it from the Orders menu to carry on with an up-to-date view list.
Don't See the Views Button?
Two conditions must both be met for the Views button to appear at the start of the Orders toolbar: you are signed in as a Back Office user with Back Office access, and saved views are switched on for your account. Saved views are not offered on the Self-Serve orders page, even in an account where they are switched on.
The account-level switch is not a self-serve setting and appears nowhere in the Order List or in any settings page. If you don't see the Views button once you have Back Office access, contact Dispatch Science Support to have saved views switched on. Until then, the Order List remembers your column layout, sort and filters in your browser instead.
Was this article helpful?
That’s Great!
Thank you for your feedback
Sorry! We couldn't be helpful
Thank you for your feedback
Feedback sent
We appreciate your effort and will try to fix the article